Classic Vanilla Butter Cake
Classic Vanilla Butter Cake is a delightful dessert ready in just 45 minutes! This easy recipe features simple ingredients like flour, sugar, and eggs. Perfect for any occasion with 12 servings. Celebrate sweetness today!

- about introduction
- the ultimate guide to classic vanilla butter cake
- why you'll love this version
- health & nutrition highlights
- recipe at a glance
- master ingredient list
- kitchen equipment essentials
- expert cooking method
- professional secrets
- perfect presentation
- storage & make - ahead
- creative variations
- expert faq solutions
- complete nutrition guide
- Recipe Card
about introduction
let’s talk about the classic vanilla butter cake a recipe that carries a delightful historical background, this cake dates back to the early 19th century, a time when baking became an art form in households across europe and america, the simplicity of this cake, with its rich vanilla flavor and buttery goodness, has made it an enduring favorite for generations, it’s often associated with home economics class recipes, teaching budding bakers the essential techniques of creaming butter and sugar key skills in any baker's toolkit .
what makes this butter cake so special ? for starters, its unique selling points lie in its versatility and ease of preparation, you can serve it simply dusted with powdered sugar or go all out by frosting it with luscious buttercream, it serves as a blank canvas for your creativity. plus, it's perfect for celebrations like birthdays or just as a treat on a cozy sunday afternoon .
the ultimate guide to classic vanilla butter cake
delving into the ultimate guide to classic vanilla butter cake reveals its rich culinary heritage embedded within countless family traditions, its fascinating origin story is rooted in humble beginnings often baked using basic pantry staples that everyone had at home during simpler times .
culturally significant, this cake bridges generations; many people have fond memories of their parents or grandparents whipping up this sweet delight in kitchens filled with laughter and love, today, it enjoys modern - day popularity not just because of nostalgia but also due to social media showcasing these beautiful cakes everywhere from instagram feeds to pinterest boards.
why you'll love this version
you’re going to adore this version because it brings unique flavor combinations right into your kitchen without complicating things. with foolproof techniques that anyone can master even if you're new to baking you’ll find success every time you whip up this classic treat .
this expert - tested method simplifies the process while ensuring you achieve that light and fluffy texture we all crave, and let’s not forget about some fantastic time - saving tips : prepare your ingredients ahead of time or even bake extra layers for future desserts. trust me; once you get started on making this cake, you'll want to share slices far and wide.
health & nutrition highlights
now let's chat about health it might surprise you that there are key nutritional benefits too. while indulgent at first glance, our classic vanilla butter cake does offer some balance if enjoyed mindfully, it contains wholesome ingredients such as eggs providing protein along with healthy fats from unsalted butter .
dietary considerations are always important; while traditional versions may not fit every lifestyle (hello gluten - free friends.), substitutions like almond flour or coconut milk adapt easily without sacrificing flavor . wellness advantages come from creating joyful moments around food making memories over shared bites adds nourishment beyond what's on our plates .
balanced nutrition facts ? each slice packs approximately 320 calories alongside carbohydrates from sugar which fuel us through active days so enjoy responsibly.
recipe at a glance
here’s what you need to know about making your very own classic vanilla butter cake :
- total preparation time : just 15 minutes will get those mixers whirring.
- skill level required : easy - peasy. perfect for beginners eager to dive into baking .
- serving size details : serves up 12 generous slices ideal for gatherings.
- cost efficiency : most ingredients won’t break the bank; they’re often already lurking in your pantry.
so there you have it the introduction section crafted beautifully around our beloved recipe while hitting key points efficiently but conversationally. happy baking adventures await as we explore more delicious details together.
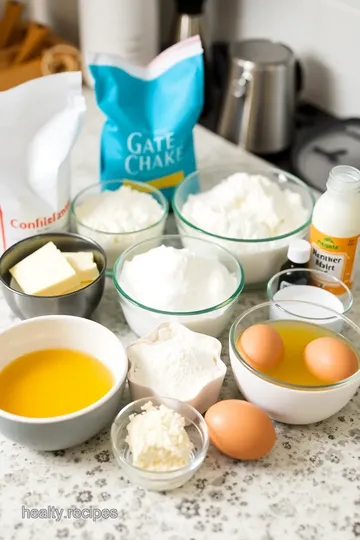
master ingredient list
premium core ingredients
when it comes to baking the perfect classic vanilla butter cake, your ingredients are key. here’s a detailed breakdown of what you’ll need :
-
all - purpose flour (2 cups / 250g)
look for a finely milled flour with a protein content around 10 - 12%, this will give your cake that fluffy texture we all adore, when shopping, check the packaging date fresh flour makes a world of difference. -
granulated sugar (1½ cups / 300g)
opt for pure cane sugar when possible, it should be white and free - flowing, if you find clumps in the bag, it might not be as fresh, store sugar in an airtight container to keep it from hardening . -
unsalted butter (½ cup / 115g)
always go for high - quality butter. grass - fed options have richer flavor and creaminess, make sure it's softened to room temperature before mixing; this helps achieve that light and airy batter . -
whole milk (1 cup / 240ml)
full - fat milk is best here it adds moisture and richness, try to use milk that's as fresh as possible; look out for any sour smell before using. -
large eggs (3)
fresh eggs are crucial. check the expiration date on the carton and always crack them open one at a time into a separate bowl just in case you encounter any bad ones . -
baking powder (2 tsp)
go for aluminum - free varieties if you're sensitive to taste or color changes in baked goods, check that it’s within its expiration date; old baking powder can lead to flat cakes. -
vanilla extract (1 tsp)
pure vanilla extract is worth every penny compared to imitation stuff, the aroma alone will elevate your cake tenfold. store it in a cool dark place away from heat sources . -
salt (pinch)
just regular table salt works fine here, but if you're feeling fancy, sea salt can add extra depth of flavor .
signature seasoning blend
while this butter cake is already fabulous on its own, adding little touches can take it over the top. here’s how :
spice combinations
a touch of nutmeg or cinnamon could bring warmth without overwhelming vanilla's sweetness just use sparingly.
herb selections
though not typical for sweet cakes, think about adding lavender flowers or even rosemary infused into your frosting or syrup drizzles if you're adventurous.
flavor enhancers
adding lemon zest could brighten up flavors beautifully without stepping on vanilla's toes .
aromatic additions
consider infusing some cardamom into your batter a tiny pinch goes such a long way with aromatic desserts like this one.
smart substitutions
sometimes life happens here are some handy swaps if you're missing an ingredient :
alternative options
you can replace all - purpose flour with gluten - free blends available nowadays; just ensure they’re formulated specifically for baking .
dietary swaps
if someone has dairy allergies, substitute unsweetened almond milk instead of whole milk and coconut oil for butter the results might surprise you.
emergency replacements
ran out of eggs ? mix one tablespoon of ground flax seeds with three tablespoons water per egg needed it acts like magic binding glue without sacrificing flavor too much.
seasonal variations
in fall months ? pumpkin puree can replace half the butter while still keeping everything moist oh so deliciously seasonal.
kitchen equipment essentials
before diving in, make sure you've got these must - have tools ready :
must - have tools
1, mixing bowls : a good set offers versatility . 1, measuring cups & spoons : accurate measurements matter. 1, rubber spatula : for scraping down bowls efficiently . 1, whisk : to incorporate air while beating ingredients together nicely . 1, toothpick : essential test tool when checking doneness after baking .
recommended appliances
your kitchen mixer will be invaluable here but hand mixers work wonders too. ovens should ideally have consistent temperature settings so invest in oven thermometers if yours tends toward unpredictability sometimes .
helpful gadgets
parchment paper makes transferring cakes easier post - baking a total lifesaver during cleanup too. cake levelers help create that perfect height between layers when frosting later on… trust me, they're worth having around .
home alternatives
no mixer ? no problem you can still whisk by hand though it'll take more muscle power. and hey use plastic wrap instead of fancy piping bags when decorating those cupcakes if necessary…
pro ingredient tips
nailing down quality matters more than you'd imagine :
selection secrets : always opt brands known for quality rather than random store - brand items they often make tastier end results overall anyway .
quality markers : for items like butter or chocolate bars ? look closely at labels indicating percentage cacao that'll help guide choices based on preferences there too . . .
storage solutions : keep spices sealed tightly away from sunlight exposure for longevity purposes and remember flours should live inside airtight containers once opened up..
money - saving tips : buy bulk quantities where feasible since you'll likely bake plenty more cakes down road…but only do this cautiously concerning perishables like dairy products all great things must come at their proper times after all..
now that we've covered our ingredient bases let’s get cooking together i can't wait to see how yours turns out...
expert cooking method
when it comes to baking a classic vanilla butter cake, following an expert cooking method can elevate your results from good to spectacular, let’s break this down into essential preparation steps and professional techniques that ensure success .
essential preparation steps
1, mise en place :
gather all your ingredients before starting, you’ll need 2 cups of all - purpose flour, 1½ cups granulated sugar, ½ cup unsalted butter (softened), 1 cup whole milk, 3 large eggs, 2 teaspoons baking powder, and a pinch of salt, for optional frosting : have on hand an additional ¾ cup unsalted butter, powdered sugar (4 cups), heavy cream or milk (2 tablespoons), and vanilla extract (1 teaspoon) .
1, prep techniques :
start by preheating your oven to 350°f (175°c) , grease two round cake pans with butter or line them with parchment paper for easy removal later on, this little trick saves you the heartache of stuck cakes.
1, time management :
keep in mind that the total prep time is about 15 minutes , so stay focused. you can whisk together the dry ingredients while the butter and sugar are creaming multitasking at its best.
1, organization tips :
use separate bowls for wet and dry ingredients during mixing stages; this keeps things tidy and reduces confusion later on when combining everything .
professional cooking method
now let’s dive into the step - by - step process that will guide you through baking like a pro .
1, mixing dry ingredients :
in a medium bowl, combine your flour, baking powder, and salt using a whisk this ensures even distribution of leavening agents .
1, creaming butter and sugar :
in a large mixing bowl, beat softened butter with granulated sugar using an electric mixer on medium speed for about 3 - 5 minutes until light and fluffy that's how you know you've done it right.
1, adding eggs & vanilla :
one at a time, add the eggs while mixing well after each addition; then mix in vanilla extract until everything is blended smoothly .
1, combining wet & dry ingredients :
gradually add half of the dry mixture to your creamed mixture while alternating with milk you want to start with dry first. mix just until combined; avoid over - mixing as this could make your cake dense .
1, baking your cake :
pour batter evenly into prepared pans smooth out those tops if needed and bake for about 25 - 30 minutes or until a toothpick comes out clean when inserted into the center .
expert techniques
here are some additional expert techniques that will help refine your baking skills :
1, temperature control :
ensure oven temperature is accurate by using an oven thermometer if possible ovens can be sneaky. preheat thoroughly so that cakes rise evenly from start to finish .
1, timing precision : rotate pans halfway through baking for even results it really makes a difference. set timers but keep an eye on them too because every oven behaves differently .
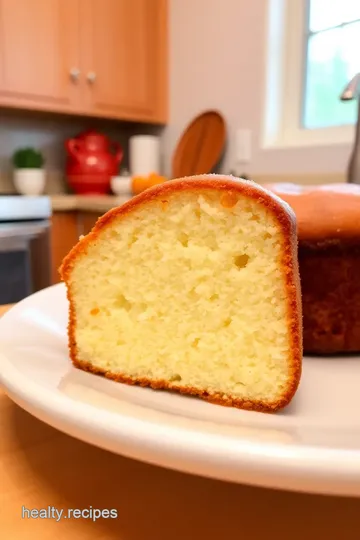
1, success indicators : look for golden brown tops; they should spring back when lightly pressed in the center a sure sign they're ready.
success strategies
even seasoned bakers encounter hiccups now and then; here are some strategies to guarantee success :
1, troubleshooting tips : if cakes sink in the middle after cooling ? it might’ve been underbaked or too much moisture was added during mixing keep notes next time.
1, quality assurance : always check ingredient freshness especially eggs and baking powder as stale items lead to disappointing results no one wants.
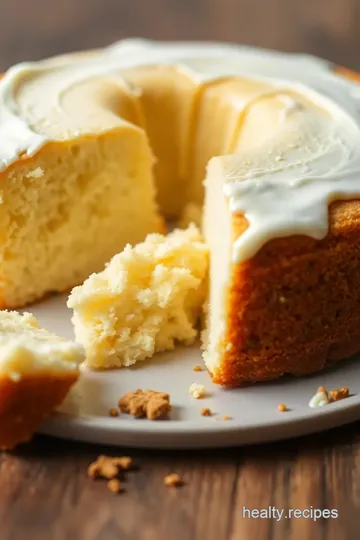
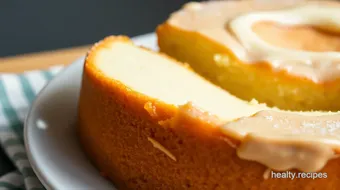
1, perfect results guide : allow cakes to cool completely before frosting; warm layers can melt icing away instead of creating beautiful decorations atop your masterpiece .
1, final touches : once fully cooled (about an hour ), frost generously if desired with homemade buttercream made from softened butter whipped with powdered sugar and garnish as fancy as you’d like.
following these steps will not only improve your vanilla butter cake game but also boost confidence in any upcoming baking adventure. happy baking.
professional secrets
when it comes to baking a classic vanilla butter cake, there are some pro tips that can really elevate your game, first off, always use room temperature ingredients, it sounds simple, but trust me this small detail makes a world of difference in texture, you want that batter to blend smoothly, creating the perfect airy consistency .
another expert technique ? don’t skip the creaming step. whipping butter and sugar together until light and fluffy introduces air into the batter, this not only gives your cake height but also creates that delightful crumb we all love .
and here’s a little kitchen wisdom : invest in an oven thermometer, ovens can be sneaky. they often don’t heat to the temperature they claim, leading to uneven baking or even cakes that sink in the middle, trust me; this gadget is worth every penny.
lastly, if you’re aiming for success guarantees with your cakes, do a toothpick test about five minutes before the time is up, if it comes out clean or with just a few crumbs stuck to it that's your cue.
perfect presentation
now let’s talk aesthetics because we eat with our eyes first. plating techniques for your butter cake can be super fun; consider using a rotating cake stand when frosting it’ll help you get those smooth edges without breaking a sweat .
for garnish ideas, fresh berries are always eye - catching. a sprinkle of powdered sugar adds elegance too (and hides any little imperfections), and if you're feeling fancy, drizzle some chocolate ganache over top for an extra indulgent touch .
serving suggestions ? how about pairing slices with whipped cream or ice cream ? a scoop alongside each piece brings back memories of childhood desserts at summer picnics .
to enhance visual appeal further, try layering sliced strawberries between two tiers of cake talk about instagram - worthy.
storage & make - ahead
planning ahead can make life easier when hosting gatherings or simply wanting leftovers on hand, for storage guidelines : keep your frosted cake covered at room temperature for up to three days; after that, pop it in the fridge for longer freshness .
preservation methods might involve wrapping individual slices tightly in plastic wrap before freezing them you won’t lose flavor this way. just remember : thaw them slowly overnight in the fridge for best results .
if reheating instructions come into play (hey we all love warm cake.), place slices on a microwave - safe plate and zap them briefly 10 - 15 seconds should do it unless you prefer more warmth .
freshness tips include checking moisture levels; adding an airtight container helps maintain softness while preventing dried - out edges.
creative variations
feeling adventurous ? there are endless creative variations you could try. flavor adaptations like adding almond extract instead of vanilla give surprising depth a lovely twist i stumbled upon last year during my experimental baking phase .
dietary modifications could mean swapping regular flour with gluten - free alternatives or using coconut milk instead of whole milk for lactose - free options without sacrificing taste.
seasonal twists are easy too think pumpkin spice during fall or lemon zest added in springtime… yum. and don't forget regional variations such as incorporating local fruits like peaches or blueberries depending on what's available near you they’ll add unique flair and freshness.
expert faq solutions
i know questions arise when tackling new recipes let’s tackle common concerns right now. one prevalent issue is dense cakes; if yours turns out heavy rather than light and airy it may have been over - mixed during incorporation stages or maybe expired leavening agents were involved ?
expert answers often revolve around patience : baking takes practice so don’t stress too much about minor mishaps along the way; learning from mistakes is half the fun.
a troubleshooting guide includes keeping track of ingredient temperatures (room temp = better mixing) plus ensuring proper measuring techniques (spoon flour lightly into cups.) .
success tips include taking notes as you experiment so next time around yields perfected results tailored just how you like them.
complete nutrition guide
finally diving into nutrition the detailed breakdown per serving shows approximately 320 calories packed full of buttery goodness but hey it’s okay to indulge sometimes.
health benefits aren’t vast here since we're talking sweets . . .but moderation goes hand - in - hand with enjoyment right ?. dietary information reveals around 14g fat which means sharing slices seems smart all good things come in small packages after all…
portion guidance suggests cutting smaller portions if serving alongside other treats at gatherings isn't variety what parties are all about ?
baking isn’t just science; it's an art form rich with flavor and memories and i can't wait to hear how your classic vanilla butter cakes turn out.
Classic Vanilla Butter Cake Card
⚖️ Ingredients:
- 2 cups (250g) all-purpose flour
- 1½ cups (300g) granulated sugar
- ½ cup (115g) unsalted butter, softened
- 1 cup (240ml) whole milk
- 3 large eggs
- 2 tsp baking powder
- 1 tsp vanilla extract
- Pinch of salt
- (Optional)
- (For the Buttercream Frosting)
- (Frosting Ingredients):
- :cup (115g) unsalted butter, softened to room temperature
- :4 cups (480g) powdered sugar
- :2 tbsp heavy cream or milk
- :1 tsp vanilla extract
🥄 Instructions:
- Step 1: Preheat your oven to 350°F (175°C). Grease and flour two round cake pans or line them with parchment paper.
- Step 2: In a medium bowl, whisk together the all-purpose flour, baking powder, and salt. Set aside.
- Step 3: In a large mixing bowl, use an electric mixer on medium speed to cream together the softened butter and granulated sugar until light and fluffy, about 3-5 minutes.
- Step 4: Add in the eggs one at a time, mixing well after each addition. Then mix in the vanilla extract until combined.
- Step 5: Gradually add half of your dry ingredient mixture into the creamed butter-sugar mixture while alternating with the milk. Start with dry ingredients first; mix until just combined before adding more milk. Repeat this step until everything is thoroughly mixed but do not over-mix.
- Step 6: Divide the batter evenly between your prepared cake pans. Gently smooth out tops if necessary.
- Step 7: Bake in preheated oven for approximately 25-30 minutes, or until a toothpick inserted into the center comes out clean.
- Step 8: Tip: Rotate pans halfway through baking for even results.
- Step 9: Once baked, remove from oven and let them cool in pans for about 10 minutes, then turn them onto wire racks to cool completely before frosting.
Previous Recipe: Bake Pretzel-Wrapped Potato Chip Bites Fast!
Next Recipe: Marinated Carrots Lox - Easy & Delicious