Classic Cheese Sliced Sandwiches
Craving a cheese sliced delight? Discover my easy recipe for Classic Cheese Sliced Sandwiches, perfect for quick snacks or family lunches.

- Discovering Comfort: Classic Cheese Sliced Sandwiches
- Essential Ingredients Guide for Your Classic Cheese Sliced Sandwiches
- Get Ready to Cook: Your Guide to the Classic Cheese Sliced Sandwich!
- Step-by-Step Process
- Extra Goodies: All You Need to Know About Classic Cheese Sliced Sandwiches
- Frequently Asked Questions
- Recipe Card
Discovering Comfort: Classic Cheese Sliced Sandwiches
Let me take you back to a sunny afternoon at my grandma’s house. i walked in, and bam—the smell of melted cheese hits me like a warm hug.
The kind you just can't resist. honestly, those classic cheese sliced sandwiches were the real mvp of my childhood. as i watched her pile on the cheese slices, i learned that happiness often comes between two slices of bread.
Now, every time i make this recipe, i can hear her laughing and guiding me. talk about nostalgia, right?
These sandwiches aren’t just about feeding your belly; they’re about connecting with those cozy moments we’ve all cherished. sometimes all we need is gooey, melty cheese and some crisp bread to feel like a kid again.
And let's be real—who doesn’t love that?
A Bite of History
The humble cheese sandwich has been around since, well, forever! you know, if sandwiches had a hall of fame, this one would definitely have an honorary spot.
Cheese and bread have traveled through time, ticking the boxes for something quick, delicious, and comforting. today, they're everywhere—not just at picnics or school lunches, but even featured as gourmet snacks.
They’re easy to whip up, taking merely 15- 20 minutes to prepare and serve. plus, the difficulty level is so easy that even your toddler could help out (with supervision, of course).
Cost? super wallet-friendly! for about $8 , you can feed four people with these beauties. that’s like, what, two cups of coffee? so, when you’re low on cash, just remember: cheese on bread is the way to go.
What’s In It for You?
Health-wise, these sandwiches might just blow your mind. packed with protein from the cheese slices , they’re perfect as an easy low carb snack or a fuss-free meal for busy days.
Plus, if you’re rolling with the keto quiche crowd or anyone exploring breakfast low carb options, this sandwich fits right in! whether it’s a casual brunch or a post-work snack, you’re hitting that sweet spot of satisfying flavors without blowing your diet.
You can jazz these up for special occasions too! planning a game night? serve these with some dips. getting together for movie marathons? cheese sandwiches are your ticket to snack heaven.
You’ll impress everyone with how simple yet scrumptiously delightful they are.
Why You’ll Absolutely Love Making These
The best part? you can customize these sandwiches like you’re picasso with cheese. want some spicy flare? throw in jalapeños.
Feeling savory? how about some fresh basil or avocado? the beauty of these classic cheese sliced sandwiches is that they’re keto snacks easy to make, and you can totally cater them to your taste buds!
Trust me, once you take that first bite—especially when the cheese is perfectly melted and the bread is crisp— you'll realize why this classic recipe never gets old.
Don’t forget, the next time you take a break and crave something quick and delicious, a classic cheese sandwich might be just what you need.
Alright, enough talk; let’s dive into the ingredients you'll need to whip up these cheesy beauties!
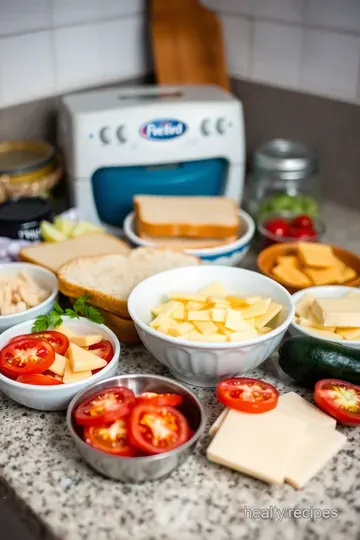
Essential Ingredients Guide for Your Classic Cheese Sliced Sandwiches
Let’s face it: we all have those days when a simple sandwich just hits the spot! you know, the kind where melted cheese drips down, and you can't help but take a big bite? yeah, that’s the magic we’re talking about here.
So, let’s break down the essential ingredients , so you can whip up these classic cheese sliced sandwiches like a pro!
Premium Core Components
First things first, let’s talk about what you need.
-
For the Sandwich:
- 8 slices of bread (use your fave: white, whole grain, or sourdough)
- 8 ounces of cheese sliced (like Cheddar, Swiss, or Gruyère – you do you!)
- 2 tablespoons unsalted butter (for extra crispiness)
-
Measurements:
- That’s about 225 grams of cheese and 30 grams of butter if you prefer metric.
Quality indicators: Look for bread that feels fresh, not stale. The cheese should have a nice aroma and not be overly soft or dry.
Storage guidelines: keep your cheese sliced in the fridge, tightly wrapped to stay fresh for about two weeks . bread is best kept in a cool, dry place, but you can freeze it for longer storage.
Freshness tips: Check any bread for mold and give cheese a quick sniff! If it smells funky, it’s time to say goodbye.
Signature Seasoning Blend
Now, let’s jazz things up because we’re not just here to slap cheese on bread, right?
- Essential spice combinations: A pinch of salt and pepper can work wonders!
- Herb selections: Fresh basil pairs beautifully with cheese. If you’re feeling adventurous, how about some rosemary or thyme ?
- Flavor enhancers: Mustard or mayo can add a tangy layer that’s pure bliss. And if you want some heat, throw in some jalapeños for a spicy kick.
- Regional variations: Southern folks might add pimento cheese, while Northern states might favor sharp cheddar. Go wild with it!
Smart Substitutions
Ever been caught without cheese? Don’t sweat it. Here are some smart substitutions :
- Common alternatives: If you don’t have sliced cheese, shredded cheese works too, just use a little more.
- Dietary modifications: Going dairy-free? Look for nut-based cheeses—they’re pretty tasty these days.
- Emergency replacements: No butter? Try mayo instead for that golden toast.
- Seasonal options: Swap in some fresh tomatoes or avocados if they’re in season!
Kitchen Equipment Essentials
Let's chat about the tools you'll need.
- Must-have tools: A non-stick skillet is your best friend. A good spatula is also essential for flipping those beauties without disaster.
- Alternative equipment: No non-stick skillet? A regular frying pan will do, just keep an eye on the heat.
- Preparation tips: Always have your ingredients prepped and within reach. It makes cooking feel like smooth jazz instead of a frantic rock concert.
- Storage solutions: Keep that cheese sliced in an airtight container to maintain its flavor!
So there you have it! By learning the ins and outs of these essential ingredients, you’ll be ready to crank out those sandwiches that make everyone weak in the knees.
As we gear up to dive into the step-by-step instructions next, i can’t help but think of all the quick bites i grabbed while busy with work, which turned into my go-to easy low carb snacks when i started watching carbs.
Who knew that this classic could be so versatile? and hey, if you want to pair this with some keto pancakes or munch on easy low carb snacks , you're in for a treat.
Alright, let’s get to it! Ready to make your own Classic Cheese Sliced Sandwich?

Get Ready to Cook: Your Guide to the Classic Cheese Sliced Sandwich!
There’s something so comforting about a classic cheese sliced sandwich . honestly, who doesn’t love that melty goodness of cheese? when i think back to my childhood, i remember my mom whipping these up on a lazy saturday.
It was our little weekend treat! these sandwiches are not just nostalgia on a plate; they're quick, easy, and perfect for any time of the day—think breakfast low carb or even as an afternoon snack.
Essential Preparation Steps
Before diving in, let’s set the stage. this is where the magic begins with a bit of mise en place —it’s fancy talk for “get your stuff together.
” you want everything prepped so you can just focus on the cooking. slice your cheese and any extra goodies, like tomatoes or avocado, and have your equipment ready: a good skillet and a spatula.
Time management is key here! you can get this all done in about 10 minutes for prep, and then you’ll just need 5- 10 minutes to cook.
Sound easy? it is!
Step-by-Step Process
-
Prep the Ingredients : Gather all your goodies. Slice any optional fillings like tomatoes or avocado. You want everything ready to go.
-
Assemble the sandwiches : lay out 4 slices of your bread. slap on 1 ounce of sliced cheese per sandwich, and if you're feeling extra, toss on some fresh basil or sliced avocado for good measure.
-
Butter the Bread : Here’s the secret! Spread butter on the outward sides is great for that golden-brown crust. Trust me, you want this.
-
Cook the sandwiches : heat up that skillet over medium heat. place the sandwiches in, and let them cook for about 2- 3 minutes .
Don’t rush! flip ‘em and give ‘em another 2- 3 minutes . you want that cheese all gooey and melted.
-
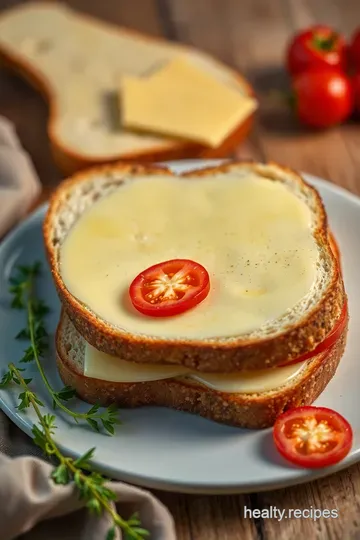
Serve and Enjoy : Once done, take them off the heat. Cut in half for an Instagram-worthy shot, and dig in while they're still warm.
Expert Techniques
Now, let’s talk about some pro tips to make your sandwich truly shine!
- Quality Checkpoints : Always keep an eye on your sandwiches while they cook. You’re looking for that golden-brown crust—that's your cue to flip.
- Timing Precision : If you’ve got a busy kitchen, try setting a timer for those 2- 3 minutes . This way, you can multitask without losing focus.
- Troubleshooting : If your cheese doesn’t melt by the time the bread is golden, it’s time to lower the heat for a moment.
Success Strategies
Oh goodness, let’s chat about those common mistakes to avoid! One biggie is letting the skillet heat up too much. You don’t want burnt bread—nobody wants that.
You can also ensure the quality assurance by tasting the cheese before cooking. is it the good stuff? if you’ve got a blend of cheeses, even better! you could patch things up by adding sauces like mustard or mayo if things are feeling bland.
Make-ahead options ? Totally doable! You can prep the fillings the night before and just assemble in the morning. That means more time for your delicious Keto pancakes later!
Final Thoughts
There you go, a classic recipe that impresses but doesn't complicate. it's perfect for when you're craving something quick yet satisfying.
Whether you enjoy your classic cheese sliced sandwich alone or with a freshly made salad, it’s sure to hit the spot.
Feeling adventurous? You could turn these puppies into Keto Snacks Easy by using low-carb bread. Just remember: the world is your oyster , or should I say, your cheese?
Now, let’s move on to some Additional Information to keep you inspired in the kitchen!
Extra Goodies: All You Need to Know About Classic Cheese Sliced Sandwiches
You know that feeling when you've got a craving for something cozy and delicious, but you don’t want to dive into a 3-hour cooking extravaganza? enter the classic cheese sliced sandwich .
Let's break down how you can take this simple but fabulous creation to another level with some pro tips and tricks, presentation hacks, storage ideas, and even a splash of creativity.
Trust me, your taste buds will thank you!
Pro Tips & Secret Hacks
Oh my gosh, i'm about to spill the tea! first off, when it comes to cheese sliced , don’t be shy.
Mixing up your cheeses can totally elevate your sandwich game. imagine cheddar paired with gooey gruyère; that's a flavor party waiting to happen!
Time-saving tip? pre-slice your optional fillings like tomatoes or avocados ahead of time. seriously, you’ll thank me at noon on a crazy workday! and don’t underestimate the power of a good buttering technique.
Use softened butter for easy spreading, and you’ll avoid tearing that beautiful loaf of bread.
Perfect Presentation: Make It Pop!
Let’s talk eye candy. cutting your sandwiches diagonally isn’t just trendy; it also makes them look restaurant-worthy. plus, who doesn’t love the sight of melted cheese oozing out? for some color, toss on a sprinkle of fresh herbs or even some vibrant basil leaves.
And don’t forget about color combinations! Pair your golden-brown sandwiches with a bright salad on the side. You’ll have a beautiful mosaic of colors that make your meal not just tasty but totally Instagrammable!
Storage & Make-Ahead Magic
Planning to whip up a batch for later? no problem! to keep your sandwiches fresh, stack them with parchment paper in between each sandwich.
This prevents them from sticking together. store them in an airtight container in the fridge where they’ll stay good for about 3 days .
Reheating is a breeze too! just pop them back into a hot skillet for a few minutes, and voilà! those gooey cheese slices will be as good as new.
You could also throw them in an air fryer if you’re feeling fancy.
Creative Variations to Tantalize
Now, if you’re looking to switch things up, let your imagination run wild or check out these fun variations. want a keto quiche vibe? swap out the bread for some almond flour crust.
A colorful postre keto or breakfast low carb option? fill your sandwiches with bacon and eggs for a satisfying morning treat.
Feel free to go seasonal too! In the summer, throw in some ripe tomatoes and basil for a Caprese twist, or in the fall, add roasted pumpkin slices for a sweet touch.
The Lowdown: Complete Nutrition Guide
Alright, let’s get real. a classic cheese sandwich can be a satisfying comfort food, but it doesn't hurt to be mindful of what you’re munching on.
With about 320 calories and 12 grams of protein , these bad boys can fill you up without breaking the calorie bank.
Consider portion guidance here: two sandwiches should be enough for an average lunch, but you might want to do some keto snacks easy if you opt for a low-carb approach.
Alternate your fillings based on dietary needs—there are loads of alternatives available to keep everyone happy around the table.
Wrap-Up: Your Sandwich Adventure Awaits!
So, what are you waiting for? grab your ingredients, roll up your sleeves, and dive into the wonderful world of classic cheese sliced sandwiches.
It doesn't have to be perfect; just have fun with it! whether it's a rainy afternoon snack or a festive gathering with friends, these sandwiches are bound to spark joy and keep everyone smiling.
Try it, tweak it, and make it your own. trust me; it’s gonna be a blast!
Frequently Asked Questions
What type of cheese works best for cheese sliced sandwiches?
For classic cheese sliced sandwiches, Cheddar, Swiss, and Gruyère are top choices due to their melting qualities. But feel free to get adventurous! Using a mix of cheeses can create a delightful flavor profile that keeps things interesting, much like your Sunday roasts.
Can I use different types of bread for cheese sliced sandwiches?
Absolutely! While white and whole grain breads are popular, sourdough can give your sandwiches a delightful tang. You could even try a lovely crusty baguette or ciabatta for a more artisanal feel—just like a picnic in the park!
How do I store leftover cheese sliced sandwiches?
To keep your cheese sliced sandwiches fresh, wrap them in foil or place them in an airtight container in the fridge. They’re best enjoyed within 1-2 days, but you can also freeze them. Just remember to toast them up again for a crispy finish!
What are some creative variations for cheese sliced sandwiches?
There are countless ways to jazz up your cheese sliced sandwiches! Consider adding fresh tomato, avocado, or even a sprinkle of herbs for added flavor. For a kick, try incorporating jalapeños or swapping in spicy pepper jack cheese. It's a bit like adding your own flair to a classic English breakfast!
Is there a healthier way to enjoy cheese sliced sandwiches?
Definitely! You can use whole grain or gluten-free bread to increase the nutritional value. Opting for lighter cheese options or adding lots of veggies can help balance those delicious flavors without the heavy load. Just picture it as a healthy twist to your pub lunch!
Can I make cheese sliced sandwiches ahead of time?
Yes, you can! Pre-assemble the sandwiches without toasting them and store them in the fridge for a quick meal later on. Just remember to grill them until the cheese is perfectly melted—think of it like prepping for a last-minute tea party!

Classic Cheese Sliced Sandwiches Card

⚖️ Ingredients:
- 8 slices of bread (white, whole grain, or sourdough)
- 8 ounces sliced cheese (e.g., Cheddar, Swiss, or Gruyère)
- 2 tablespoons unsalted butter (for toasting)
- Fresh tomato slices (optional)
- Sliced avocado (optional)
- Mustard or mayonnaise (optional)
- Fresh basil or spinach leaves (optional)
🥄 Instructions:
- Step 1: Gather all ingredients and equipment. Slice any optional fillings like tomatoes or avocado.
- Step 2: Lay out 4 slices of bread; top each with 1 ounce of sliced cheese. Add optional fillings as desired, then top with remaining bread slices.
- Step 3: Spread butter on the outer sides of the sandwiches.
- Step 4: Heat the skillet over medium heat. Place sandwiches in the skillet and cook for 2-3 minutes until golden brown. Flip and cook for an additional 2-3 minutes until the cheese melts.
- Step 5: Remove from heat, slice in half if desired, and serve warm.
Previous Recipe: Nutritious Kabocha Squash Buddha Bowl: A Wholesome Autumn Delight
Next Recipe: Matcha Golden Milk Bliss: Cozy Comfort in a Cup