Classic Cherry Pie: A Slice of Summer
Discover my classic cherry pie recipe that captures the essence of summer with fresh cherries and a flaky crust. Perfect for any gathering!

- A Slice of Summer: Exploring Cherry Pie
- Essential Ingredients Guide: The Heart of a Great Cherry Pie
- Mastering Professional Cooking: Essential Techniques for Success
- Pro Tips & Secrets: Making the Perfect Cherry Pie
- Perfect Presentation: Make It Shine
- Storage & Make-Ahead: Plan Ahead to Savor
- Creative Variations: Make It Your Own
- Complete Nutrition Guide: Know What You're Eating
- Wrapping It Up: Lovin’ the Cherry Pie Life!
- Frequently Asked Questions
- Recipe Card
A Slice of Summer: Exploring Cherry Pie
Have you ever taken a bite of something that instantly transported you back to a sunny afternoon? that’s how i feel about cherry pie .
Picture this: i'm in my grandma's kitchen, the air heavy with the sweet-tart aroma of cherries baking to perfection. just thinking about it makes me smile! this classic cherry pie recipe has been a family favorite for generations, and let me tell you, it’s the ultimate summer dessert.
But why cherry pie? well, it's not just about the taste. this pie encapsulates summer vibes, nostalgia, and family gatherings.
Seriously, every time i whip up this homemade cherry pie , i feel those warm, fuzzy memories coming back. plus, with the cherry filling made from fresh cherries, it's like a celebration in every bite!
Recipe Overview: A Little History Meets Modern Delight
Now, a bit of a trip down memory lane—cherry pie has been a staple in north american kitchens for centuries.
Can you believe it’s as old as the country itself? it’s been a symbol of american traditions, especially during summer when cherries are at their peak.
Nowadays though, this pie has taken a modern twist, popping up at picnics, barbecues, and even fancy dinner parties.
When you think about timing and effort, this easy cherry pie recipe requires about 1 hour and 30 minutes, including cooling time.
It’s also labeled as medium difficulty. don't let that scare you! with a few simple steps, you'll find that baking this cherry dessert is totally doable, even if you’re a newbie in the kitchen.
And trust me, nothing beats the satisfaction of serving a handmade pie.
When it comes to cost, making this pie isn’t going to break the bank. You’ll find fresh cherries and the other ingredients for a few bucks, and with this recipe yielding eight servings , it's perfect for feeding friends and family or hoarding all to yourself!
Key Benefits: More Than Just Sweetness
You might be thinking, “What’s the big deal about a cherry pie?” Well, hold on to your forks because there are some amazing benefits!
First off, cherries are packed with antioxidants. they’re not just pretty—these little gems are known to help reduce inflammation too! plus, this traditional cherry pie has that sweet-tart balance that brings joy with every forkful.
What’s more? this pie shines in a variety of settings. think about it: summer birthday parties, fourth of july cookouts, or a cozy sunday dinner.
It fits right in with holiday traditions as well! if you’re looking for stunning cherry dessert ideas , this one is a showstopper for sure.
And, for those of you wondering about cherry pie variations , you can always sprinkle in some almond extract for a nutty kick or swap out the crust for a gluten-free version.
Flexibility is a cherry pie's strength, making it a delightful option for diverse diets.
Lastly, the beauty of this pie lies in its comfort food charm. Every slice feels like a warm hug on a plate, giving you that homey feeling we all crave.
So, are you ready to roll up your sleeves and get baking? Let’s dive into the ingredients you'll need for crafting your very own classic cherry pie!
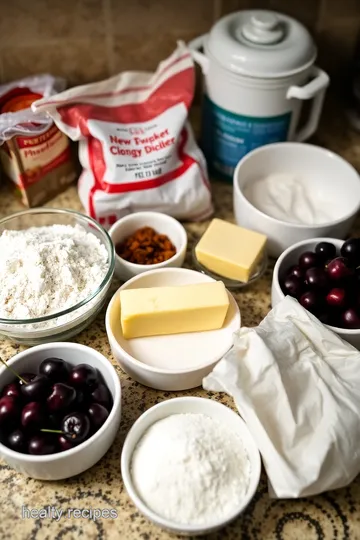
Essential Ingredients Guide: The Heart of a Great Cherry Pie
When it comes to baking, especially something as classic as a homemade cherry pie , having the right ingredients is crucial.
This isn't just about tossing stuff together and hoping for the best. it’s about creating something delicious, mouthwatering, and memorable.
So, let’s dive into the essentials you need to whip up that easy cherry pie recipe you've been dreaming about!
Premium Core Components
First off, let’s talk specifics. Here’s what you’ll need for the cherry pie filling and crust.
For the dough, you’re looking at 2.5 cups (or 315 grams) of all-purpose flour , 1 tsp (6g) salt , and 1 tbsp (12g) granulated sugar .
The magic happens with 1 cup (227g) of unsalted butter , chilled and cubed. oh, and don’t forget the 6-8 tbsp (90-120ml) of ice water to bring it all together!
Now, quality matters. look for butter that smells fresh (don’t go for any funky stuff, please!). the flour should feel soft and pure.
Store it in a cool, dry place, and it’ll serve you well for a while. pro tip? always taste your cherries before using them for freshness.
Sweet-tart cherries are the gold standard for a best cherry pie . also, keep your dough chilled because a cherry pie crust made with cold ingredients will be buttery and flaky.
Signature Seasoning Blend
Next, let’s jazz it up with some seasoning! for the cherry filling, you want a combination of 1 cup (200g) granulated sugar , ¼ cup (30g) cornstarch , and a little ground cinnamon .
Why cinnamon? it adds warmth and depth. a splash of 2 tbsp lemon juice (30ml) and 1 tsp (5ml) vanilla extract will enhance that cherry goodness.
If you’re feeling a little fancy, throw in ¼ tsp almond extract ; it gives a nod to those traditional cherry pies you remember from grandma’s kitchen.
Smart Substitutions
But, uh-oh! what if you don’t have all this exactly? no worries! common substitutions are your best friend. run out of fresh cherries? frozen ones will do the trick—just thaw and drain them before use.
Gluten-free flours are also a fantastic option if you’re looking for gluten-free pie options . and if you're on a sugar-reduction journey, try natural sweeteners like honey; just adjust to your taste.
Kitchen Equipment Essentials
Let’s not forget your gear! to get this classic cherry pie rolling, you’ll need some essential kitchen tools. a mixing bowl , rolling pin , and a 9-inch pie dish are non-negotiables.
A baking sheet is smart, too—it’ll catch any sweet drips that might escape. trust me, you don’t want to be cleaning that oven later!
When preparing your pie dough recipe , making sure your workspace is organized will save you time and stress. also, keep your tools like the paring knife handy for pitting those cherries.
You want to be efficient, right?
Final Thoughts
Once you have your ingredients and tools lined up, it’s all about execution. this fruit pie recipe connects back to simpler times, filled with laughter and family gatherings.
Plus, who doesn’t love the smell of a baking cherry pie wafting through the house? it's pure comfort food, y’all.
So, are you ready to dive into those instructions? i promise, making that cherry pie will be a breeze with all this prep work behind you.
We'll be on our way to a delightful summer dessert that’ll make every bite worth savoring. let’s get baking!
Mastering Professional Cooking: Essential Techniques for Success
Cooking like a pro isn’t just about knowing how to flip a fancy omelet or flambé a steak. it’s also about getting down to the nitty-gritty of preparation, execution, and the little things that make your meal shine.
One of my absolute favorites is a classic cherry pie , which is not only a summer staple but also a great way to showcase professional cooking methods.
Let’s dig into how you can step up your game!
Essential Preparation Steps
Before you do anything, get your mise en place together. now, that fancy french term just means having all your ingredients measured and prepped before you start cooking.
Trust me, it saves time and helps avoid that frantic scramble mid-recipe. for our cherry pie, that means pitting about 4 cups of fresh cherries and measuring out your sugar and cornstarch.
Don’t forget about time management ! it’s like a dance, really. keep an eye on your watch. for instance, while your dough is chilling in the fridge for 30 minutes , you can start mixing your cherry filling.
Efficient, right?
Organization is key, too! keep your workspace tidy and tools accessible. want to avoid accidents? keep your knives sharp and clean.
Also, safety first! wash your hands often, especially after handling raw ingredients.
Step-by-Step Process
Now, onto the nitty-gritty of assembling your homemade cherry pie . Here’s a clear step-by-step outline:
- Preheat your oven to 425° F ( 220° C) .
- Combine your dry ingredients for the crust in a large bowl.
- Cut in your chilled butter until you get a crumbly texture. Add ice water gradually until it forms a dough. Wrap these bad boys up and chill!
- For the filling, mix your pitted cherries with 1 cup of sugar , ¼ cup of cornstarch , 2 tbsp of lemon juice , and a pinch of vanilla extract. Try not to eat the cherries before they make it into the pie!
As you approach the end of the pie making process, remember to bake it for 45- 50 minutes or until your crust's golden and the filling is bubbling blissfully—like a sweet, warm promise of summer.
Expert Techniques
Okay, now let’s talk secret sauce. Here are some pro tips for cherry pie perfection.
Quality checkpoints are super important! as you mix your pie filling, taste it! you want that perfect balance of sweet and tart.
If it’s too sweet, throw in a bit more lemon juice. for texture, the cornstarch should give you a nice thick filling that doesn't run all over the plate.
And if your pie crust isn’t cooperating? troubleshoot by making sure your butter is chilled enough. cold fat creates that flaky layer we all love.
Also, if you notice your crust is browning too quickly, loosely cover it with foil and keep on baking!
Success Strategies
Even the best bakers mess up sometimes. Avoid these common hiccups:
- Soggy Bottom - Pre-baking the bottom crust for 10- 15 minutes can save you from this culinary disaster.
- Underdoing it - Keep an eye on that timer! Nothing worse than a half-baked pie.
Quality assurance tip: After you take it out from the oven, let it cool for at least 2 hours . This sets your filling and makes slicing a piece a breeze.
Lastly, if you’re short on time, many aspects of your cherry pie can be made ahead. You can even prepare your pie dough a day before and keep it in the fridge!
In doing all this, remember your goal is creating a comforting dish that’ll bring smiles to your loved ones. your cherry pie recipe becomes a canvas for your personal touch, whether it's adding a whisper of almond extract or pushing the boundaries with a crumble topping.
As we slide into the last section, take your cherry pie success and extend that to all your baking adventures.
Whether you're tackling summer desserts or classic comfort food, you now have strategies that bake up some serious wins!
With that, there’s always more to explore. Keep your mind open, and your oven prepped—for more expert cooking methods that’ll elevate your skills!

Pro Tips & Secrets: Making the Perfect Cherry Pie
Oh my gosh, let me tell you—baking a homemade cherry pie is like a rite of passage for anyone who loves summer desserts.
Here are some insider pro tips to elevate your game when tackling this easy cherry pie recipe .
Chef's Personal Insights
First off, I always say, chill the dough. Seriously. Keeping your pie dough cold will give you that flaky, buttery crust everyone dreams about. Trust me, no one wants a soggy bottom!
When selecting your cherries for the cherry pie filling , go for the darkest, sweetest ones you can find. i mean, what's the point of making a cherry pie if you’re using sad, mushy cherries? and if fresh ones are hard to come by, don’t hesitate to try frozen.
Just be sure to thaw and drain them appropriately.
Time-Saving Techniques
Now, if you’re in a hurry, consider using store-bought pie crust . it’s a great shortcut and still perfectly delightful. just don’t forget about that special touch—perhaps a hint of almond extract in the filling to make it feel homemade.
Another time-saver? prep your ingredients ahead of time. once you’ve pitted those fresh cherries , toss them in a bit of lemon juice to keep them vibrant and fresh until you’re ready to use them.
Flavor Enhancement Tips
For a little flavor boost, i love adding ground cinnamon to the filling. it pairs so well with the tartness of the cherries! and if you're feeling adventurous, throw in a hint of nutmeg for something extra special.
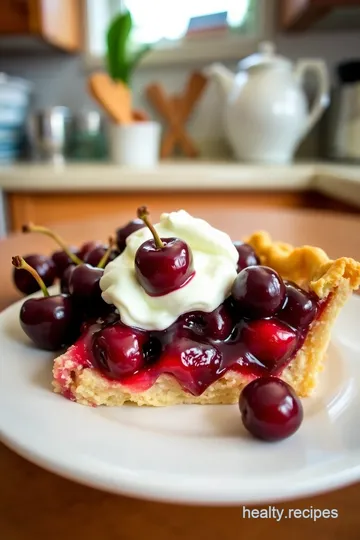
Presentation Advice
Now, let’s talk about making your pie look as good as it tastes. after baking, let it cool for a while, but before serving, dust the top with powdered sugar.
It’s like a little fairy dust to delight your guests! and if you want the plate to scream "i'm a rustic cherry pie master," go for a simple lattice top.
It adds a homey feel that pairs perfectly with the flavor.
Perfect Presentation: Make It Shine
So, you’ve baked your pie, and it’s glorious. But how do you make it visually pop? Here are some quick pointers!
Plating Techniques
When cutting your pie, use a sharp knife and wipe it clean between slices. This way, you'll get beautiful, clean slices every time!
Garnish Ideas
A scoop of vanilla ice cream on the side is a classic pairing. You can even reheat that cherry pie a touch—who doesn’t love a warm slice with cold ice cream melting on top? A sprig of fresh mint is great for a bit of color, too!
Color Combinations
Pair your cherry dessert with a bright cup of tea or a refreshing glass of lemonade for a pop of color. It’s summer, after all!
Visual Appeal Tips
Now, don't underestimate the power of a rustic look. leave a few cherries or berries on the platter for that homemade charm.
Your friends will be snapping pictures before they even take a bite!
Storage & Make-Ahead: Plan Ahead to Savor
Storage Guidelines
If you have leftovers—lucky you! Store your pie in an airtight container at room temperature for about 2 days. You can also refrigerate it, but make sure it’s well covered.
Preservation Methods
Freeze any slices you won’t eat right away. just wrap them tightly in plastic wrap and then foil. they’ll be fine for up to three months.
When you’re ready to indulge, just reheat them in the oven!
Reheating Instructions
For reheating, I recommend using the oven rather than a microwave. Reheat at 350° F ( 175° C) for about 10- 15 minutes for that fresh-baked taste again.
Freshness Duration
For optimal taste, it’s best consumed within four days. Honestly, who can wait that long to eat a classic cherry pie ?
Creative Variations: Make It Your Own
Now, if you’re feeling creative (and who doesn’t?), let’s dive into some fruit pie recipe variations!
Flavor Adaptations
Try mixing in some blueberries or peaches along with the cherries for a mixed berry delight. Not only does it taste fantastic, but it also gives you a unique twist that’ll impress everyone!
Dietary Modifications
For gluten-free options, you can replace the flour with almond or gluten-free flour blends and still get a fab crust.
And if you're cutting down on sugar, maybe try using honey—just adjust accordingly.
Seasonal Twists
Depending on the season, swap cherries for other stone fruits like peaches or plums. This way, you can enjoy pie all year long with the freshest ingredients.
Regional Variations
Have you ever heard of cherry pie with almond ? that twist is a fan favorite in many regions. you basically add slivered almonds into the filling for an added crunch and flavor depth.
Complete Nutrition Guide: Know What You're Eating
Let's be real, if you're enjoying a slice of homemade cherry pie , you want to feel good about it, right? Here’s a quick breakdown:
- Calories : About 300 per slice (this can vary)
- Protein : 3g
- Fat : 14g
- Carbohydrates : 43g
- Sugar : 20g
- Fiber : 2g
- Sodium : 100mg
It’s totally a comfort food, but hey, those fresh cherries come packed with vitamins, so consider it a little boost along with your dessert!
Wrapping It Up: Lovin’ the Cherry Pie Life!
Making this classic cherry pie isn’t just about baking; it’s about creating memories. gather your friends and family, get in the kitchen, and make some pie magic together! remember, whether you're going for traditional cherry pie or adding your creative spin, the key ingredient is love (and a little bit of patience).
Now go fill your home with that unmistakable cherry pie aroma and enjoy every single bite. happy baking!
Frequently Asked Questions
What type of cherries are best for a cherry pie recipe?
For the best flavor, use fresh, sweet cherries like Bing or Rainier. Tart cherries, such as Montmorency, are also excellent for a more tangy flavor. If fresh cherries aren't available, you can use frozen cherries, but be sure to thaw and drain any excess liquid before using them in your filling.
Can I use a store-bought crust for my cherry pie recipe?
Absolutely! Using a store-bought pie crust can save time and effort. Make sure to follow the package instructions for baking times; you can still prepare the cherry filling from scratch for a homemade taste with convenience.
How can I prevent my cherry pie from being too runny?
To prevent a runny filling, it's important to use cornstarch or another thickener like tapioca. Additionally, allowing the pie to cool for at least two hours before slicing helps the filling set properly. Pre-baking the bottom crust for 10-15 minutes can also reduce sogginess.
What are some variations I can try with this cherry pie recipe?
You can make a mixed berry pie by adding blueberries or raspberries to the cherry filling. Alternatively, use a crisp topping instead of a top crust for a delightful texture contrast. For an extra flavor kick, consider incorporating a touch of almond extract or slivered almonds into the filling.
How should I store leftover cherry pie?
Leftover cherry pie can be stored in the refrigerator for up to 4-5 days. To keep the crust from getting soggy, cover it lightly with foil or plastic wrap. You can also freeze slices for longer storage; just make sure they are wrapped tightly in plastic and aluminum foil to protect against freezer burn.
Is cherry pie healthy? What are the nutritional considerations?
Cherry pie, like most desserts, should be enjoyed in moderation. While cherries are nutritious, containing vitamins and antioxidants, the pie crust and added sugars do contribute to calories and fat. If you're looking for a lighter option, consider reducing the sugar or trying a whole grain crust to enhance the nutritional profile.
Classic Cherry Pie: A Slice of Summer Card
⚖️ Ingredients:
- 2 ½ cups all-purpose flour
- 1 tsp salt
- 1 tbsp granulated sugar
- 1 cup unsalted butter, chilled and cubed
- 6-8 tbsp ice water
- 4 cups fresh cherries, pitted
- 1 cup granulated sugar
- ¼ cup cornstarch
- 2 tbsp lemon juice
- 1 tsp vanilla extract
- ¼ tsp almond extract (optional)
- ½ tsp ground cinnamon
- 1 tbsp unsalted butter, cut into small pieces (optional)
🥄 Instructions:
- Step 1: Combine flour, salt, and sugar in a large bowl.
- Step 2: Cut in the chilled butter until the mixture resembles coarse crumbs.
- Step 3: Gradually add ice water until the dough comes together.
- Step 4: Form into two disks, wrap in plastic, and chill for at least 30 minutes.
- Step 5: In a separate bowl, combine pitted cherries, sugar, cornstarch, lemon juice, vanilla extract, almond extract (if using), and ground cinnamon. Set aside.
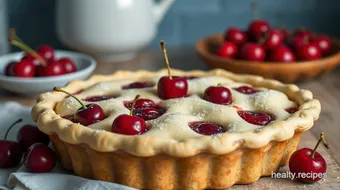
- Step 6: Preheat the oven to 425°F (220°C). Roll out one dough disk on a floured surface and place it in the pie dish.
- Step 7: Pour the cherry filling into the crust, dot with butter pieces, and cover with the second rolled-out dough disk.
- Step 8: Seal edges and cut slits in the top crust for steam to escape.
- Step 9: Place the pie on a baking sheet to catch drips.
- Step 10: Bake for 45-50 minutes, or until the crust is golden and the filling is bubbling.
- Step 11: Allow the pie to cool for at least 2 hours before serving to let the filling set.
Previous Recipe: Creamy Saag with Paneer: A Favorite North Indian Spinach Delight
Next Recipe: Classic Italian Grinder Sandwich: A Hearty Stack of Flavor