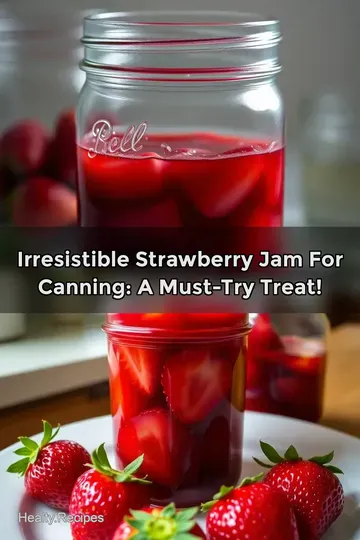
Classic Strawberry Preserves: Sweetness in a Jar
Delight in making classic strawberry preserves that capture summer freshness! Perfect for spreading on toast or adding to desserts. Check it out!

- From My Kitchen to Yours: A Journey into Strawberry Preserves
- Essential Ingredients Guide: Getting Down to the Nitty-Gritty
- Mastering the Art of Homemade Strawberry Preserves
- Pro Tips & Secrets for Perfect Strawberry Preserves
- Perfect Presentation: Make it Look as Good as it Tastes
- Storage & Make-Ahead: Keeping the Goodness Fresh
- Creative Variations: Get Inspired!
- Complete Nutrition Guide
- Final Thoughts: Get Jamming!
- Frequently Asked Questions
- Recipe Card
From My Kitchen to Yours: A Journey into Strawberry Preserves
Oh my gosh, have you ever tasted something that just takes you back in time? for me, that’s fresh strawberry preserves.
I remember being a little kid, slathering it on my toast while sitting at my grandma's kitchen table. the sun would beam through the window, and those preserves were like summer trapped in a jar.
Today, i’m diving into homemade strawberry preserves and sharing my tips on how to make your own. let’s capture that sheer delight in every spoonful!
What Are Strawberry Preserves Anyway?
Strawberry preserves are a beloved classic that dates back to the 18th century, with roots in traditional british preserving methods.
Can you imagine how different life was back then? people had to find ways to make their favorite fruits last all winter long! fast forward to today, and this sweet spread is a staple in many households across america.
Why? because who doesn’t want a taste of summer in a jar? strawberry jam for canning is super popular, especially for those weekend brunches or cozy nights in.
The best part? this recipe is easy peasy. with a prep time of just 10 minutes and cook time of about 30, you’ll have your fresh strawberry goodness ready in under an hour.
If you’re like me and sometimes get a bit confused in the kitchen, don’t worry! this is an easy strawberry jam recipe that anyone can tackle.
Plus, it yields about 4 cups, so you'll have plenty to share (or hoard away for yourself—we won’t tell!).
Why Strawberry Preserves Are a Must-Make
You might be wondering, “Why should I go through the trouble of making strawberry preserves?” Well, let me hit you with some quick reasons.
First off, the health benefits are pretty solid. strawberries are packed with vitamin c and antioxidants, making them a great choice for your family.
You know, keeping it healthy while treating your sweet tooth!
And let’s talk versatility. whether you're slapping it on some warm toast, topping a cheesecake, or mixing it into yogurt, you can't escape how strawberry preserves can elevate even the simplest of dishes.
Ever try it with pancakes? pure magic.
Also, there's something extra special about homemade jams. when you whip up a batch yourself, it's perfect for special occasions like picnics or family get-togethers.
Nothing screams “i care” more than a jar of your own canned strawberries .
Plus, making strawberry preserves gives you an edge over store-bought options. You control the sweetness and can ditch any artificial ingredients. Honestly, who needs them?
Gather Your Gear
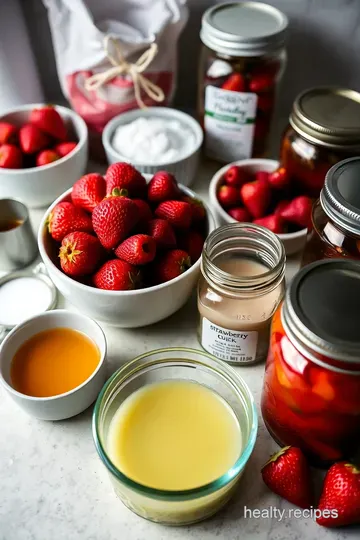
Now that you're itching to dive into canning jams , let’s check out what you’ll need. grab your fresh strawberries, granulated sugar, some lemon juice, and a couple of staples from your pantry.
You’ll also need jars, of course—sterilization is key here to keep those bad boys fresh!
So, are you ready to roll? Because it’s time to get to the fun part: the ingredients!
When you're ready to whip up this sunny treat, i promise that every bite will be a taste of nostalgia, filled with love, sunshine, and perhaps a few jam-related mishaps (hey, i’ve had my share of sticky situations!).
So let’s dive into that ingredient list and get this strawberry preserves train moving!
Essential Ingredients Guide: Getting Down to the Nitty-Gritty
Alright, my fellow food ensoiasts! Today, we're diving headfirst into the Essential Ingredients Guide . If you want to whip up strawberry preserves or any other delicious treat, you’ll need to know your stuff! So, let’s break it down into some easy-peasy bites!
Premium Core Components
First things first—let's talk measurements. when you're making something like strawberry jam for canning , you gotta get this right.
Use 2 pounds (900 grams) of fresh strawberries. a good rule of thumb is to keep your fruit ripe; if it’s not sweet when you bite into it, it’s not gonna work in your preserves.
And don’t even get me started on sugar. you’ll need 4 cups (800 grams) of granulated sugar. yes, you read that right—it's jam, not a diet plan!
Now, quality indicators? look for those bright, vibrant strawberries. no mushy or bruised ones allowed! for storage, if you’ve got leftovers (let’s be honest, who does?), keep those babies in a cool, dark place or your fridge.
The shelf life is about three weeks if sealed properly. for freshness tips, always check the smell! fresh strawberries smell sweet and kinda.
..well, strawberry-like. if they smell musty, pass.
Signature Seasoning Blend
Now, don't sleep on the spices! yeah, you’ve got the strawberries, but think about adding some zing! a little acidity goes a long way, so splash in 1/4 cup (60 ml) of fresh lemon juice.
It’s like adding sunshine into your jar! and remember, a pinch of salt enhances sweetness. sweet and salty—oh, heaven!
Smart Substitutions
Got dietary restrictions? no problem! if you can’t have sugar, try using a sugar substitute, but be aware they can mess with the gelling process in your easy strawberry jam recipe.
If you don’t have strawberries, feel free to throw in some other fruits like raspberries or blueberries—go wild! just make sure to adjust the sugar, as those may be less sweet.
Need an emergency replacement? got fresh fruit? use that! you can grab ripe bananas to make a sweet topping too.
Just be sure to adjust the quantities and keep that balance right. you'll still get your sweet fix without a hitch!
Kitchen Equipment Essentials
So, here come the heavy-hitters! you’ll need a large, heavy-bottomed saucepan. seriously, don’t skimp here. a good saucepan is the secret to even cooking.
Toss in a ladle for pouring your finished jam and a wooden spoon for mixing. optional but super helpful—a candy thermometer, primarily to check when your preserves hit 220° f ( 104° c) .
I wish i had a dime for every time i forgot that.
Once your preserves are made, you'll need sterilized jars to store them in. honestly, nothing feels more rewarding than pulling out jars filled with your own canned strawberries at the end of summer.
Final Thoughts Before Mixing It Up
Whew, that was a mouthful! but don't worry; i promise it’s super simple once you get the hang of it! by knowing your signature seasoning blends and having those essential kitchen tools, you’re golden.
So, are you ready to dive into the juicy goodness of your own strawberry preserves ? Grab your ingredients, gather your gear, and let's get cooking! Your taste buds will thank you later!
In the next section, we’ll dive into the step-by-step instructions to make your very own easy strawberry jam —trust me, it’s a total game changer! Let's do this!
Mastering the Art of Homemade Strawberry Preserves
Oh my gosh, there’s nothing quite like homemade strawberry preserves ! it’s like capturing summer in a jar. trust me, when you pop that lid off and the sweet aroma hits you, it's an explosion of nostalgia.
Do you remember running through the strawberry fields as a kid? the taste of fresh strawberries then hits different, right? so, let’s dive into the world of strawberry jam for canning and make some magic happen!
Essential Preparation Steps
First off, let’s talk about mise en place . sounds fancy, right? but it just means having everything ready before you start.
Chop those berries, measure out your sugar, and squeeze that lemon juice beforehand. it’ll keep you from scrambling later and give you an a+ for organization!
When you’re in the kitchen, time is everything. you wanna manage it like a pro. set a timer for your 30-minute cook time ; staying on schedule is key.
And organization strategies? keep utensils and ingredients in their lanes. imagine your kitchen looking like a culinary runway!
Safety is another biggie. when you're dealing with hot preserves, watch out! keep a damp cloth handy to quickly wipe any sticky spills.
Trust me; you don’t want any sugary disasters on your hands.
Step-by-Step Process
Alright, let’s get into the nitty-gritty of the recipe .
-
Start by prepping those strawberries. Give 'em a wash, hull, and halve. Toss 'em in a heavy-bottomed saucepan.
-
Now, mix the strawberries with 4 cups of sugar, 1/4 cup lemon juice, and 1/4 teaspoon of salt. Let it sit for about 15 minutes to mingle.
-
Heat up that mix on a medium-high flame. stir until all that sugar dissolves. now comes the fun part: bring it to a rolling boil! but don’t forget to turn down the heat after about 20- 25 minutes .
-
Check consistency like a hawk—use a candy thermometer to hit 220° f ( 104° c) , or do the cold plate test! put a spoonful on a cold plate, stick it in the fridge for a minute, and see if it gels up.
Score!
-
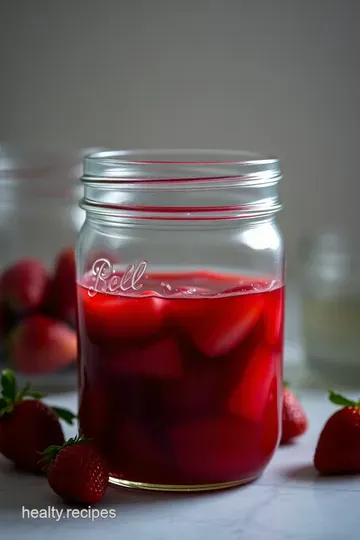
Time to jar it up! Ladle the hot preserves into sterilized jars, making sure to leave about 1/4-inch headspace .
-
Seal those jars like a treasure chest and let them cool completely.
Expert Techniques
Here’s where it gets interesting. you wanna make sure your berries are ripe; otherwise, your easy strawberry jam recipe might taste less sweet than you anticipated.
If you’re wondering why your jam didn’t set, it could be that your temperature control was off, or maybe you didn’t use enough sugar.
Quick tip: If you want a little zing, splash in some balsamic vinegar while cooking. It elevates your strawberry preserves to gourmet status!
And don’t forget about quality checks. Look for the glisten and thickness—those are your visual cues!
Success Strategies
Now, let’s avoid the common pitfalls. One big mistake is rushing the process. Each step matters! After all, we’re crafting a sweet masterpiece here.
Quality assurance is crucial, friends. Always taste as you go (a chef's perk!).
If you want to make ahead, prepare those jars! Just remember, once opened, keep that jar in the fridge, and it’ll be good for about two weeks .
Wrap It Up!
Canning might seem daunting, but with these canning jam recipes under your belt, you’ll be a pro in no time! imagine gifting a jar of your homemade strawberry jam during the holidays or having it on your breakfast table.
It’s a delightful touch of homemade goodness that simply wows everyone.
Stay tuned for our next section, where i’ll throw in some more fun facts and tricks, plus tips on how to mix things up with different fruits! trust me; you're gonna love this journey into the world of jam.
Happy preserving!
Pro Tips & Secrets for Perfect Strawberry Preserves
Oh my gosh, making your own strawberry preserves is so satisfying! i mean, it’s like bottling up summer in a jar.
Here are some insider tips i've picked up along the way to make your jam-making adventure not just easy but fun!
Chef’s insights: use the ripest strawberries you can find. seriously, underripe ones just ain't gonna cut it for sweetness. and here's a pro tip: don’t skip the lemon juice ! it not only adds some zing but helps the preserves set up better.
Time-saving techniques: if you’re tight on time, try prepping your strawberries while you’re waiting for the water to boil. multitasking is key! plus, you can chop them up ahead of time and store them in the fridge until you're ready to use them.
Just be sure they’re at room temp when you’re ready to cook, so they’ll mix well with the sugar.
Flavor Enhancements: I love to sneak in a splash of vanilla or even a little balsamic vinegar. It really elevates the flavor! Trust me, no one will guess your secret ingredient.
Presentation advice: when you're done canning, let me tell ya, those jars just look gorgeous lined up on the shelf! you can totally use cute labels to dress them up, or even tie a little ribbon around the top.
It’s great for gifts or just to impress your brunch buddies.
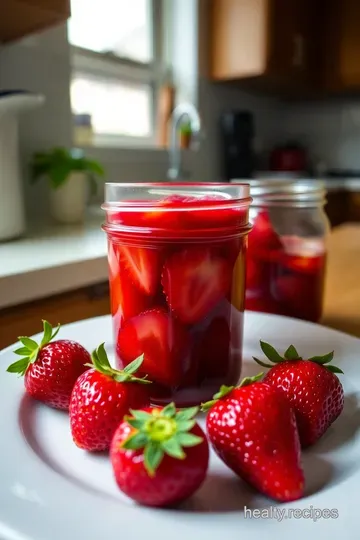
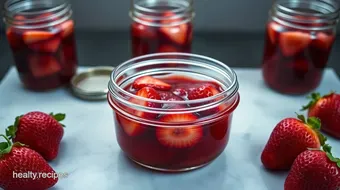
Perfect Presentation: Make it Look as Good as it Tastes
So, let’s talk about how to make these beauties look irresistible. Presentation can totally elevate your jam game!
Plating techniques: when you're serving your easy strawberry jam recipe , put it in a small bowl with a cute spoon.
And it’s so simple, but a white dish really makes that vibrant red pop!
Garnish Ideas: Fresh mint leaves on top can really amp up the look. They give that “I know what I’m doing” vibe.
Color Combinations: Pairing your bright preserves with thick slathered butter on warm toast? Total visual win! The contrast of the shiny red jam and creamy butter is just chef’s kiss .
Visual Appeal Tips: Use glass jars if you can—you’ll want everyone to see that ruby-red glory. A little creativity with the labels adds a charming touch, too.
Storage & Make-Ahead: Keeping the Goodness Fresh
Alright, let’s be real—sometimes you just can’t eat all that amazing strawberry jam for canning in one go. Here’s how to keep it fresh.
Storage guidelines: after you've made your preserves, store them in sterilized jars. if you opt for the water bath canning method, those babies can last up to a year on your shelf! no need to shove them in the fridge right away.
Preservation Methods: If you want to keep them out of the fridge, ensure you process your jars correctly. It’s all about locking in that goodness.
Reheating Instructions: If you’re using your preserves later, just pop it in the microwave for a few seconds. Stir it up, and you’re good to go!
Freshness Duration: Once opened, keep them in the fridge and use them within a month. Not that they’ll last that long around here—trust me!
Creative Variations: Get Inspired!
Feeling adventurous? There’s so much you can do beyond the classic strawberry preserves.
Flavor Adaptations: Why not mix in some other fruits like rhubarb for a tangy twist? Peach and strawberry are also a match made in heaven!
Dietary Modifications: You can swap regular sugar for a sugar alternative, but remember it might alter the consistency. Play around till you find what works for you!
Seasonal Twists: Think about adding spices like cinnamon or nutmeg for fall or even a sprinkle of chili for a summer kick.
Regional Variations: Try mixing in some local flavors if you have access to unique fruits or spices. You’d be surprised how a little local flair can make your jam pop!
Complete Nutrition Guide
Now let’s keep it real—what's going into your delicious strawberry jam recipe ? Here’s the lowdown:
Detailed Breakdown: Each refrigerated serving can pack around 196 calories. That’s a lot of sweetness, but it’s also jam, so you know the drill!
Health Benefits: Strawberries are loaded with Vitamin C and antioxidants. It's a win for your taste buds and your health!
Dietary Considerations: Just keep in mind the sugar content—48 grams per serving isn’t a small feat!
Portion Guidance: Reserve about a tablespoon for spreading on your breakfast toast. It’s a perfect starter for sugar cravings without going overboard.
Final Thoughts: Get Jamming!
Whether you’re mastering the easy strawberry jam recipe for the first time, or you’re a canning pro, just have fun with it! you know what they say: practice makes perfect! don’t be afraid to experiment and let your creativity shine.
So, grab those ripe strawberries and start your canning journey. You’ll have jars of sunshine ready to brighten up cold winter days. Happy jamming, friends!
Frequently Asked Questions
What’s the difference between strawberry preserves and strawberry jam?
Great question! Strawberry preserves typically have larger pieces of fruit and a thicker consistency compared to strawberry jam, which is more spreadable. This texture difference makes preserves perfect for those who want to enjoy bites of fruit along with the sweet syrup!
How long do homemade strawberry preserves last in the fridge?
If you store your strawberry preserves in sterilized jars and keep them in the fridge, they can last for up to 3 weeks. If you choose to can them properly using a water bath, they can last up to a year in a cool, dark place.
What can I do if my strawberry preserves are too runny?
If you find that your strawberry preserves haven't set as expected, you can return the mixture to the heat and add a bit more pectin or some lemon juice. Cook it for a few more minutes while checking the consistency, and remember, patience is key!
Can I use frozen strawberries to make strawberry preserves?
Absolutely! Just make sure to thaw the frozen strawberries completely and drain any excess liquid before using them in your recipe. This way, you'll still achieve delicious preserves without compromising on flavor.
Do I need to use a candy thermometer to make strawberry preserves?
While a candy thermometer can be quite helpful, especially for beginners, it’s not mandatory. You can rely on the plate test instead; just spoon a little of the mixture onto a chilled plate and see if it gels after a minute in the fridge.
How do I enhance the flavor of my strawberry preserves?
For an exciting twist, consider adding a splash of balsamic vinegar, a dash of vanilla extract, or some chopped fresh mint while cooking. These additions can elevate the flavor profile and make your preserves distinctly memorable!
Classic Strawberry Preserves: Sweetness in a Jar Card
⚖️ Ingredients:
- 2 pounds fresh strawberries, hulled and halved
- 4 cups granulated sugar
- 1/4 cup freshly squeezed lemon juice
- 1/4 teaspoon salt
- 4 sterilized 1-cup jars with lids
🥄 Instructions:
- Step 1: Rinse and hull the strawberries, then cut them in half. Place them in a large heavy-bottomed saucepan.
- Step 2: Add sugar, lemon juice, and salt to the strawberries. Stir gently to combine and let sit for 15 minutes to allow the strawberries to release their juices.
- Step 3: Heat the mixture over medium-high heat, stirring until the sugar dissolves. Bring to a boil, then reduce the heat to maintain a gentle boil for about 20-25 minutes, stirring frequently.
- Step 4: Use a candy thermometer to check when the mixture reaches 220°F (104°C) or perform the plate test by spooning a little onto a cold plate and seeing if it gels after a minute in the fridge.
- Step 5: Remove from heat, skim off any foam, and ladle hot preserves into sterilized jars, leaving about 1/4-inch headspace. Wipe the rims with a clean cloth, place lids on, and seal tightly.
- Step 6: Allow jars to cool completely at room temperature, then store in the refrigerator or process them in a water bath for longer shelf life.
Previous Recipe: Vibrant Pitaya Bowl: A Tropical Breakfast Delight for Everyone
Next Recipe: Fiery Ginger Syrup: My Easy Recipe for a Sweet & Spicy Boost