Crispy Italian Cannoli with Creamy Ricotta Filling
Satisfy your sweet tooth with my authentic Italian cannoli recipe! Crispy shells filled with creamy ricotta and chocolate chips await you. Try it now!

- Indulging in Tradition: The Italian Cannoli Recipe
- Recipe Overview: A Bite of History
- Key Benefits
- Suggestions for a Flavorful Feast
- Ingredients for Your Cannoli Adventure
- Your Go-To Guide for Essential Ingredients
- Mastering the Art of Professional Cooking
- Pro Tips & Secrets to Mastering Italian Cannoli
- Perfect Presentation for Your Cannoli
- Smart Storage & Make-Ahead Tips
- Creative Cannoli Variations
- Complete Nutrition Guide
- Wrap up Your Cannoli Adventure
- Frequently Asked Questions
- Recipe Card
Indulging in Tradition: The Italian Cannoli Recipe
You ever had one of those moments where the right dessert just makes everything better? for me, it’s biting into a crispy, cream-filled cannoli .
Oh my gosh, the first time i tasted an authentic italian dessert like this, i was completely hooked! i was in a charming little italian restaurant tucked away in a corner of a busy new york street.
There it was, the sicilian pastry i’d only heard about. creamy ricotta filling leaking out of a crunchy shell? yes, please! and today, i’m excited to share my go-to italian cannoli recipe that you can whip up at home.
Trust me; your taste buds will be doing a happy dance!
Recipe Overview: A Bite of History
Cannoli is more than just a delightful treat; it’s a slice of history. originating from sicily, these dreamy desserts date back to the arab occupation of the island in the 9th century.
Can you imagine a time when pastries were all about celebrating life? fast forward to today, they’re a beloved part of italian culture and found in bakeries all over the u.
S.
Now, you might think making these deep-fried desserts is complicated, but it’s really about breaking it down into steps. the beauty lies in the crispy homemade cannoli shells filled with a dreamy ricotta cheese filling .
The whole process takes about 1 hour and 45 minutes, and yes, it’s classified as medium difficulty—not impossible, but you'll want to roll up those sleeves! plus, you’re looking at a cost-effective recipe yielding around 12 delicious cannoli.
Key Benefits
Let’s talk benefits! one thing to note is that italian dessert recipes don’t just taste amazing; they often pack a nutritional punch too.
The ricotta cheese filling typically has protein from the cheese, and when you add some zesty citrus, you’re also sneaking in some vitamin c.
Beyond health, this treat is perfect for special occasions, whether it's a birthday bash or a cozy family dinner. who wouldn’t love to be served a plate of these beauties? and really, the charm of a cannoli is its versatility; you can swap in cannoli filling variations like chocolate or fruit purées to cater to different tastes, giving you a unique spin each time.
Plus, let’s not forget that nothing can beat the nostalgia of crafting this beloved dessert just like grandma would. if you’re all about displaying your cooking skills at gatherings, this is the jackpot.
Suggestions for a Flavorful Feast
Before we get cooking, let’s chat about how to amp up your cannoli game. ever thought about decorating these little beauties? dust them with powdered sugar or sprinkle some mini chocolate chips on top; the possibilities are endless! you could even add a touch of citrus zest in desserts for that fresh kick.
And i promise, once you discover the best frying oil for cannoli , you’ll be frying with confidence. choose something with a high smoking point, like vegetable oil, so your shells turn out crispy and perfect, not oily.
Alright, enough chitchat! You’re probably itching to dive into this cannoli cream recipe by now. Let's get into the ingredients and craft your own delicate layers of happiness!
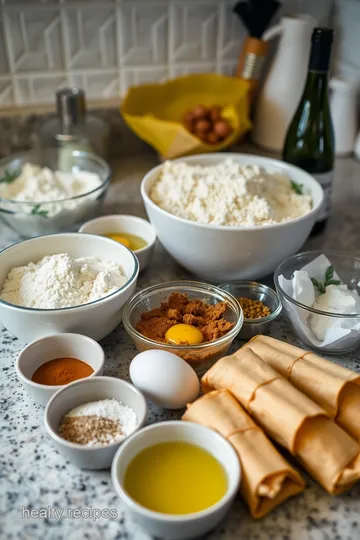
Ingredients for Your Cannoli Adventure
Ready, set, time to pull together the magic! Here’s what you’ll need:
-
For the Dough:
- 2 cups all-purpose flour
- 3 tablespoons granulated sugar
- 1/2 teaspoon salt
- 1/4 teaspoon ground cinnamon
- 3 tablespoons unsalted butter, softened
- 1 large egg (or egg yolk)
- 1/4 cup dry white wine or apple cider vinegar
-
For the Filling:
- 2 cups ricotta cheese (drained)
- 1/2 cup powdered sugar, sifted
- 1/4 teaspoon vanilla extract
- Zest of 1 orange or lemon
- 1/2 cup mini chocolate chips
- Optional: Chopped pistachios for garnish
-
For Frying:
- Vegetable oil (about 4 cups)
So, are you ready to whip up this decadent dish? It's time to embrace the art of crafting the perfect cannoli , and trust me, you won’t regret it!
Your Go-To Guide for Essential Ingredients
Cooking isn’t just about slapping ingredients together and hoping for the best. it’s about understanding the core components that make your dishes sing—like that authentic italian dessert vibe when you’re whipping up an italian cannoli recipe .
Here’s a friendly dive into the must-have ingredients, seasonings, and equipment to nail those classic italian pastry recipes!
Premium Core Components
First up, let’s talk Premium Core Components . Getting the right ingredients is crucial.
-
Measurements: You’ll wanna use 2 cups of all-purpose flour for your dough. But if you’re feeling fancy or have a kitchen scale, that’s about 250 grams . Balance is key!
-
Quality indicators: look for flour that’s finely milled and warm, not too dusty. for your ricotta cheese filling , fresh ricotta makes all the difference.
A brick of ricotta should be moist, not dry.
-
Storage: Store your flour in a cool, dry place, and make sure your ricotta is kept chilled. Bonus tip: Ricotta can last about a week in the fridge, but it's always best fresh!
-
Freshness Tips: When buying citrus for zest, you want that bright, shiny skin. A bit of a squeeze? Firm is good!
Signature Seasoning Blend
Now for the Signature Seasoning Blend . This is where you can get a little creative!
-
You’ll need classic spices like ground cinnamon for your dough and maybe even a hint of nutmeg. Keep it simple!
-
For herbs, I’d say fresh is best—think of a blend of mint and parsley if you’re feeling adventurous with your cannoli filling variations .
-
Don’t forget about flavor enhancers . A splash of vanilla in your ricotta will level things up!
-
Regions can make this fun too! You can replicate the Sicilian pastries vibe with hints of orange or lemon zest. It just screams Italy, don’t you think?
Smart Substitutions
Sometimes, life throws you a curveball and you might run out of an ingredient.
-
Common Alternatives: Don’t have ricotta? No worries! Try cottage cheese, just make sure to drain it well.
-
Dietary Modifications: If you're whipping up a vegan version, consider using a plant-based yogurt for that creamy texture!
-
Emergency Replacements: Short on flour? Out of eggs? Not a problem! You can bind dough with mashed bananas or applesauce in a pinch.
-
Seasonal Options: Using whatever fruits are in season can jazz up your fillings. Fresh berries can make a delightful twist on that classic cannoli filling!
Kitchen Equipment Essentials
Let’s chat gear! The right kitchen equipment essentials make everything smoother.
-
Must-Have Tools: You’ll definitely need a rolling pin and some cannoli forms to shape those crispy shells.
-
Alternative Equipment Options: A clean can will do if you can’t find cannoli forms. Just make sure it’s well-cleaned!
-
Preparation Tips: Always prep your ingredients before starting. It keeps you organized—no one wants to be frantically searching for that one spice mid-recipe.
-
Storage Solutions: After you’ve made that deliciousness, store your cannoli in an airtight container but keep the filling separate until you’re ready to serve. Keep your shells crispy!
Alright, now that you’ve got those essentials in mind, you’re armed and ready to take on the world of homemade cannoli shells and delightful cannoli cream recipes .
Whether it’s for a fancy dinner party or just a sunday treat, the joy of crafting the perfect cannoli is truly rewarding.
Stay tuned for step-by-step instructions that’ll guide you through how to make cannoli like a pro. Trust me, once you nail that crispy shell with a luscious ricotta cheese filling , you’ll wanna share them around like confetti!
Mastering the Art of Professional Cooking
When you dive into the world of professional cooking methods, you're not just throwing ingredients together—it's an art, a dance in the kitchen, and trust me, it can feel more like "so you think you can cook?" than a walk in the park.
Whether you're mastering the authentic italian dessert of cannoli or perfecting a savory dish, understanding the essential preparation steps is key to success.
Essential Preparation Steps
First off, let’s talk about mise en place . fancy french term, right? it just means having everything in its place before you start cooking.
Chop your veggies, measure your ingredients, and have that ricotta cheese out and ready. it makes everything flow smoother. you don’t wanna be scrambling for flour while you’ve got a bubbling pot on the stove!
Time management is also crucial. set timers for tasks, especially when making something like an easy cannoli recipe that involves multiple components.
You have about 30 minutes of prep and 1 hour of chilling time for the dough. trust me, if you get distracted during that 15-minute fry , you could end up with burnt shells.
So, keep an eye on that oil—should be a perfect 350° f ( 175° c) for frying.
Now, organization is your best buddy in the kitchen. use bowls to separate your ingredients, and clean as you go.
You’ll thank yourself when it’s time to eat and not clean up a disaster zone!
Oh, and safety! always be cautious with hot oil; it can be tricky. have a slotted spoon ready, and never leave your frying pan unattended.
Your kitchen should feel safe, not like a scene from a cooking show gone wrong.
Step-by-Step Process
Alright, here’s where the fun really begins. I’ll break it down for ya with some straightforward steps:
-
Prepare the dough: mix 2 cups all-purpose flour with 3 tablespoons sugar and a dash of salt. toss in 3 tablespoons softened butter, and mix until crumbly.
Add an egg and a 1/4 cup white wine—again, totally key for flavor!
-
Chill Out: Wrap that dough up and into the fridge for at least 1 hour . This will make it easier to roll out later. Seriously, don’t skip this part!
-
Roll It Out: Once chilled, roll it out to about 1/8-inch thick . Use a cookie cutter to chop it into circles.
-
Shape Them Up: Wrap these dough circles around your cannoli forms, sealing them with egg wash for that extra stickiness.
-
Fry Away: Heat up your oil to that perfect 350° F and fry for about 2- 3 minutes per side until golden and lovely.
-
Fill ‘Er Up: Once they cool, use a pastry bag to fill those crispy shells with your sweet ricotta filling.
Expert Techniques
Let’s get into the nitty-gritty! for fabulous results, be sure to strain your ricotta well. you want that filling creamy but not soupy—no one likes a soggy cannoli! and while we’re talking about fillings, feel free to get creative.
Lemon zest gives that citrus zing, and you can even play with chocolate or pistachios for a rich texture.
During frying, keep an eye on your temperature. things can go south quickly if the oil gets too hot or too cold.
If it’s too hot, your shells will burn; too cold, and they’ll be greasy. it’s all about finding that sweet spot!
Success Strategies
Now, let’s avoid some common mistakes. first, don’t overcrowd your frying pan—this leads to uneven cooking. also, remember to seal those edges tight! otherwise, they’ll pop open while frying, and nobody wants a deconstructed cannoli.
Quality assurance is key. keep an eye on that dough; if it's too dry, it won’t roll out nicely. and when you fill them, do it just before serving to maintain that crunch.
Leftover shells? store them separately to keep them crisp!
Finally, make-ahead options are a lifesaver. you can prepare the dough ahead of time and chill it, then just roll and fry when guests are coming over.
It’s all about enjoying the process and having fun!
Now that we’ve covered the ins and outs of making those glorious crispy italian cannoli with creamy ricotta filling, are you ready to dive deeper? join me in the next section: additional information .
We’ll explore more on flavor variations, creative decorating, and the perfect pairings for your italian desserts. let's whip up some magic!
Pro Tips & Secrets to Mastering Italian Cannoli
When diving into the world of homemade cannoli, it's good to have some insider secrets up your sleeve. i've had my fair share of kitchen failures – like the time my cannoli shells burst open in the fryer (so not cute).
But hey, that's how we learn, right? here’s what i’ve gleaned over the years:
Must-Know Kitchen Hacks
-
Chill, baby, chill!
always start with chilled dough . it’s key for crispy, flaky shells! before you roll out your dough, wrap it and toss it in the fridge for at least one hour.Trust me, this little step prevents the deep-fried mess from happening.
-
Strain your ricotta
for a smooth and creamy filling, drain your ricotta cheese well. i mean, nobody likes watery filling! just wrap it in cheesecloth and let gravity do its thing while you prep the cannoli shells . -
Fry in Batches
Don’t overcrowd your frying pan. Give those little guys space so they fry evenly. About 3-4 at a time is usually a sweet spot. -
Seal the deal
make sure to seal those edges tightly, or you’ll find your shells swimming in oil instead of being perfectly crispy.A little egg wash goes a long way here!
-
Serve Fresh
Cannoli are best enjoyed right after filling. The longer they sit, the more soggy they get. So, if you want that lovely crunch, fill ‘em just before serving.
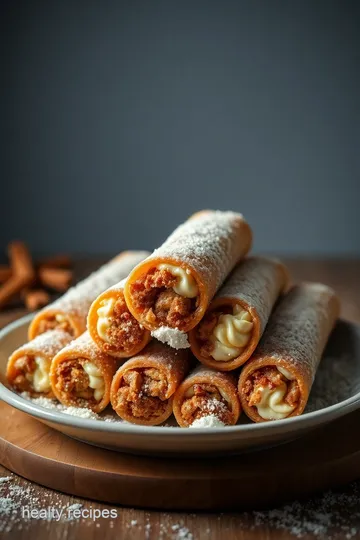
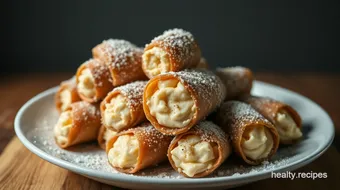
Perfect Presentation for Your Cannoli
Now let’s talk about the fun stuff: putting on a show ! You’ve put all this work into making these decadent Italian sweets, so why not make them as pretty as they are delicious? Here’s how:
Plating Like a Pro
-
Use Tall Stands
Layering your cannoli on a cake stand adds drama. Make them look like the stars of the dessert table. -
Garnish Away
Think chopped pistachios, a dusting of powdered sugar, or even mini chocolate chips sprinkled on top. It’s all about that visual appeal! -
Color Combinations
Pair with fresh berries, citrus segments, or mint leaves. These not only add color but also a pop of freshness to your plate.
Fun Decoration Ideas
-
Drizzle chocolate sauce or a homemade fruit coulis over the cannoli for an extra touch of elegance.
-
Use citrus zest in your filling for a bright burst of flavor and a striking presentation. Lemon zest? Yes, please!
Smart Storage & Make-Ahead Tips
Planning is essential, right? If you’re like me and love to prep ahead of time, here’s how to store those scrumptious cannoli and keep the magic alive:
Storage Guidelines
-
Keep the cannoli shells and the ricotta filling separate until you’re ready to serve. This way, the shells maintain their crispiness!
-
The filling can usually last for 2-3 days in an airtight container in the fridge. Just be sure to avoid excess moisture!
Reheating & Freshness
- It’s best to fill them right before serving. But if you must, chill your dough recipes and filling separately to whip them out in a pinch.
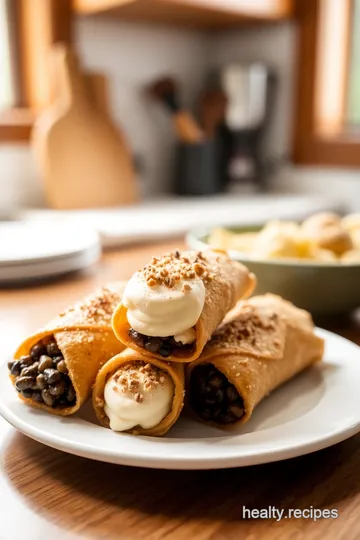
Creative Cannoli Variations
Feeling adventurous? You can totally customize your cannoli! Here are some fun, creative twists that can turn your classic cannoli preparation into something special:
-
Chocolate Cannoli : Mix in some cocoa powder into your ricotta filling. Or dip the ends of the filled cannoli in melted chocolate.
-
Fruit-Flavored Cannoli : Think about using a touch of raspberry puree or even a splash of peach preserves in the filling. Summer flavors for the win!
-
Vegan Cannoli : Swap out the ricotta with blended silken tofu and keep it plant-based. It’s amazing what you can do!
Complete Nutrition Guide
Let’s keep it real – enjoying your cannoli is just as important as knowing what's in it. Here’s a quick look at those gorgeous bites:
What’s Inside?
For each cannoli, you’re looking at about 210 calories . that means you have room to indulge without going overboard! packed with flavors, these cannoli cream recipes provide protein from the ricotta and just the right amount of sweetness.
Dietary Considerations
If you're counting those macros or watching your sugar intake, adjust the filling accordingly. Play with portion sizes and flavor variations to suit your taste buds and dietary needs!
Wrap up Your Cannoli Adventure
So there you have it! making your own italian cannoli recipe isn’t just about the pastries; it’s about the flavors and memories they create.
Each bite reminds me of cozy dinners and joyful conversations. with these pro tips and tricks, you’re ready to create your very own magical moments.
Whether you're a seasoned chef or a kitchen novice, i promise you can tackle this recipe. just have fun and let your creativity shine!
Now, roll up your sleeves, get your ingredients ready, and let’s bring that Sicilian pastry love into your home! You’ve got this!
Frequently Asked Questions
What is the best way to store leftover Italian cannoli?
To keep the crispy shells intact, store the uncooked shells and filling separately. The shells can be kept in an airtight container at room temperature for up to a week, while the filling should be refrigerated and used within 3 days. If filling leftovers, fill only the cannoli you plan to eat immediately.
Can I make the dough for the Italian cannoli recipe ahead of time?
Yes, you can prepare the dough ahead of time! After making the dough, wrap it tightly in plastic wrap and refrigerate it for up to 2 days. Alternatively, you can freeze the wrapped dough for up to a month—just be sure to thaw it in the refrigerator before rolling and frying.
What are some variations I can try with this Italian cannoli recipe?
There are many fun variations! You can make chocolate cannoli by adding cocoa powder to the filling or dipping the ends in chocolate. For a fruity twist, try incorporating pureed fruits or preserves into the ricotta. If you're looking for a lighter option, consider a vegan cannoli using plant-based alternatives.
How can I achieve the perfect crunchy shell for my cannoli?
For a perfect crunchy shell, ensure your dough is rolled out thinly and well-chilled before frying. Don't overcrowd the fryer, as this can lower oil temperature, leading to soggy shells. Fry the cannoli shells until they are golden brown, and drain them well on paper towels to remove excess oil.
Is there a way to make the ricotta filling smoother?
Yes! To achieve a smoother ricotta filling, strain your ricotta cheese to remove excess moisture, or blend it in a food processor until smooth before mixing it with sugar and other ingredients. This will enhance the texture and make it more enjoyable in the cannoli.
Can I use different types of cheese in my cannoli filling?
While traditional Italian cannoli use ricotta, you can experiment with other cheeses like mascarpone for a richer flavor, or a mix of ricotta and cream cheese for added creaminess. Just be sure to adjust the sweetness accordingly if using a different type of cheese.
Crispy Italian Cannoli with Creamy Ricotta Filling Card
⚖️ Ingredients:
- 2 cups all-purpose flour
- 3 tablespoons granulated sugar
- 1/2 teaspoon salt
- 1/4 teaspoon ground cinnamon
- 3 tablespoons unsalted butter, softened
- 1 large egg
- 1/4 cup dry white wine or apple cider vinegar
- 2 cups ricotta cheese, drained
- 1/2 cup powdered sugar, sifted
- 1/4 teaspoon vanilla extract
- Zest of 1 orange or lemon
- 1/2 cup mini chocolate chips
- 2 tablespoons chopped pistachios (optional)
- Vegetable oil for frying
🥄 Instructions:
- Step 1: In a large bowl, combine flour, sugar, salt, and cinnamon.
- Step 2: Cut in softened butter until the mixture resembles coarse crumbs.
- Step 3: Add the egg and wine; mix until a dough forms.
- Step 4: Wrap the dough in plastic wrap and refrigerate for at least 1 hour.
- Step 5: In a mixing bowl, combine drained ricotta, powdered sugar, vanilla extract, and citrus zest.
- Step 6: Stir in mini chocolate chips until evenly distributed.
- Step 7: On a floured surface, roll out the chilled dough to about 1/8-inch thickness.
- Step 8: Cut into circles (approximately 4 inches in diameter).
- Step 9: Wrap the dough circles around the cannoli forms, sealing the edges with a bit of egg wash.
- Step 10: Heat oil in a deep frying pan to 350°F (175°C).
- Step 11: Fry the dough in hot oil until golden brown, about 2-3 minutes per side.
- Step 12: Remove and drain on paper towels; let cool slightly before removing from the forms.
- Step 13: Using a pastry bag, pipe the ricotta filling into each cooled shell.
- Step 14: Dust with powdered sugar and sprinkle with chopped pistachios if desired.
Previous Recipe: Homemade Spiced Chai Tea: How to Make Chai Tea with Warm Spices
Next Recipe: Chewy Oatmeal & Chocolate Chip Cookies: A Sweet Nostalgic Treat