Healthy Peanut Butter and Jelly Sandwich
Make a Healthy Peanut Butter and Jelly Sandwich in just 10 minutes! This easy recipe features whole grain bread, natural peanut butter, low-sugar fruit spread, and optional chia seeds. Perfect for breakfast or a snack!

- about introduction
- secrets behind perfect healthy peanut butter and jelly sandwich
- what makes this recipe special
- health & nutrition highlights
- recipe at a glance
- master ingredient list
- professional cooking guide
- success guaranteed tips
- perfect presentation
- storage & make - ahead
- creative variations
- expert faq solutions
- complete nutrition guide
- Recipe Card
about introduction
the peanut butter and jelly sandwich, affectionately known as the pb&j, has been a staple in american homes for generations, its historical roots trace back to the early 1900s when peanut butter gained popularity as an affordable source of protein, the combination of sweet fruit preserves with nutty peanut butter quickly became a beloved choice among children and adults alike, today, this classic sandwich is not just a childhood favorite; it's also embraced by health - conscious individuals seeking a quick and nutritious meal option .
what sets our healthy pb&j apart is its use of whole grain bread, natural nut butters, and low - sugar fruit spreads making it an ideal treat without compromising on flavor or nutrition, this recipe delivers delightful taste while providing essential nutrients that fuel your day .
secrets behind perfect healthy peanut butter and jelly sandwich
this recipe showcases rich culinary heritage rooted in american comfort food traditions, the fascinating origin story of the pb&j reflects how simple ingredients can create something extraordinary whenever you bite into this sandwich, you are tasting decades' worth of nostalgia. it holds cultural significance across various regions; in many households, it symbolizes love and care passed down through generations .
in modern times, the healthy version has surged in popularity as more people are looking for quick yet wholesome meals amidst busy lifestyles, with its easy preparation method and customizable nature, this dish fits perfectly into any meal plan while satisfying both kids’ cravings and adult dietary needs .
what makes this recipe special
the unique flavor combinations elevate the traditional pb&j experience to new heights. imagine smooth or crunchy peanut butter paired with your favorite low - sugar fruit spread perhaps raspberry for tartness or strawberry for sweetness ? add fresh slices of banana or strawberries if you're feeling adventurous.
our foolproof techniques ensure that even novice cooks can whip up this delicious sandwich effortlessly, expert - tested methods guarantee that each bite offers balanced flavors without overwhelming sweetness a common pitfall with store - bought spreads .
time - saving tips include prepping your ingredients ahead so you can assemble your healthy pb&j quickly during hectic mornings or after - school snacks.
health & nutrition highlights
when it comes to key nutritional benefits, our healthy pb&j shines bright. packed with protein from natural peanut butter and fiber from whole grain bread, it's perfect for maintaining energy levels throughout the day, plus, incorporating chia seeds adds omega - 3 fatty acids a bonus for those seeking added wellness advantages.
dietary considerations have never been easier with this recipe : it's gluten - free adaptable using rice cakes instead of bread if needed. furthermore, substituting nut butters allows everyone to enjoy their own tailored version based on preferences or allergies .
balanced nutrition facts reveal approximately 320 calories per serving along with essential vitamins derived from fresh fruits used in conjunction with quality ingredients all contributing positively toward overall well - being .
recipe at a glance
ready to dive into creating your own delicious creation ? here’s what you need to know about preparing our healthy peanut butter and jelly sandwich :
- total preparation time : just 10 minutes.
- skill level required : easy enough for anyone seriously.
- serving size details : one hearty sandwich packed full of goodness .
- cost efficiency : very budget - friendly compared to other snack options out there.
so grab those ingredients because we’re about to enjoy one scrumptious ride into nostalgia while keeping things nutritious too.
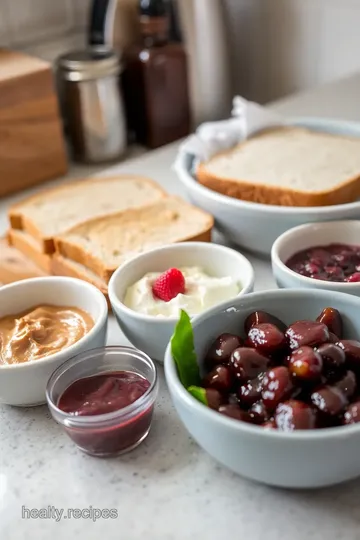
master ingredient list
premium core ingredients
-
2 slices whole grain bread
- measurement : two slices .
- quality indicators : look for organic or sprouted options with minimal additives .
- selection tips : choose bread that feels fresh and has a good texture, check the ingredient list aim for whole grains as the first ingredient.
- storage guidance : keep your bread in a cool, dry place, preferably in an airtight bag to prevent it from going stale .
-
2 tablespoons natural peanut butter
- measurement : exactly two tablespoons (about 32 grams) .
- quality indicators : go for brands that list peanuts as the only ingredient; avoid added sugars and oils if possible .
- selection tips : smooth or crunchy ? that’s up to you. just ensure it's natural no hydrogenated oils. try tasting different brands until you find your favorite .
- storage guidance : store in a cool pantry or fridge after opening, especially if it's freshly ground; it can last longer there .
-
2 tablespoons low - sugar fruit spread
- measurement : two tablespoons are perfect for spreading without overwhelming sweetness .
- quality indicators : check labels for low sugar content (ideally under five grams per serving) and real fruit ingredients .
- selection tips : raspberry, strawberry, or blueberry spreads are all great choices. aim for ones labeled "fruit spread" rather than "jam" to keep sugar levels lower .
-
1 tablespoon chia seeds (optional)
- measurement : one tablespoon adds nutrition nicely without overpowering flavor .
- quality indicators : look for whole chia seeds with no additives; they should be black or white but not mixed with anything strange.
- selection tips : buy them from bulk bins if available it’s often cheaper and avoid those fancy packs unless you really need them . -
fresh fruit slices (optional but recommended) measurement : a banana or a handful of strawberries works well .
- quality indicators : choose ripe fruits but not overly soft; they should smell sweet.
- selection tips : seasonal fruits are often tastier – check local farmers' markets when they're open.
- storage guidance : store uncut fruits at room temperature until ready to slice .
signature seasoning blend
while this healthy pb&j doesn’t require complex seasoning blends like some gourmet dishes do, adding just a few extras can elevate it.
-
cinnamon
- this warm spice brings out flavors beautifully just sprinkle some on top of your fruit spread before closing up the sandwich .
-
sea salt
- a tiny pinch can enhance sweetness remarkably well while balancing flavors not too much though.
smart substitutions
sometimes life throws curveballs like running out of peanut butter right when you're craving this sandwich.
-
nut butters
- almond butter is fantastic if you want something nutty and slightly sweeter; sunflower seed butter works perfectly too for nut allergies .
-
fruit spreads
- you could make your own by blending fresh fruits with just enough honey or agave syrup a bit of lemon juice keeps them vibrant.
kitchen equipment essentials
you don’t need fancy gadgets here just some trusty tools will do.
must - have tools :
1, butter knife – for spreading smoothly without tearing bread . 1, measuring spoons – to get those portions just right. 1, a sharp knife – perfectly cuts through sandwiches without squashing them flat .
recommended appliances :
- none needed besides maybe a toaster if you want that slight crunch.
helpful gadgets :
- an easy - to - clean silicone spatula comes in handy when scooping out every last bit of peanut buttery goodness from jars .
home alternatives :
- if you're missing any tools ? use another clean utensil around the house like a spoon instead of measuring spoons you’ll be fine.
pro ingredient tips
want insider secrets on making this healthy pb&j even better ?
1, peanut butter selection secrets be adventurous. try different brands till you find one that hits home the creaminess can vary wildly between types .
1, quality markers always check expiration dates on everything from breads down to jams to ensure freshness and taste perfection .
3 . storage solutions keep opened products sealed tightly for example, store leftover fruit spreads upside down in the fridge so they stay fresher longer (a little tip i learned.) .
4 . money - saving tips homemade versions rule. making your own jam reduces costs while letting you control what goes into it plus nothing beats homemade deliciousness.
so there we go a wonderfully simple yet satisfying take on an old classic that checks all boxes health - wise while being incredibly tasty too. it’s time to gather these ingredients and whip up your very own healthy pb&j sandwich you won’t regret it.
professional cooking guide
essential preparation steps
before diving into any recipe, it's crucial to set yourself up for success, mise en place is the first step, which means gathering and prepping all your ingredients before you start cooking, this not only saves time but also keeps you organized, for instance, if you're chopping vegetables, do it in a systematic way cut everything uniformly for even cooking .
next, consider your prep techniques, different tasks require different approaches; for example, dicing onions versus slicing peppers, a sharp knife is essential here. also, manage your time wisely by breaking down the recipe into manageable parts, if something takes longer to cook (like grains or proteins), get that started first .
and don't underestimate organization. keep your workspace tidy and clear of clutter as you go along, it makes a huge difference when you're moving between tasks .
professional cooking method
once you're prepped and ready to roll, follow these steps carefully :
1, start with temperature control : always preheat ovens or pans according to the recipe's instructions this ensures even cooking .
1, follow the step - by - step process : stick closely to the sequence outlined in your recipe (unless you've got some culinary confidence), each step often builds on the last one .
1, timing precision : use a timer. timing can make or break a dish; be precise about how long things need to cook at specific temperatures .
1, watch for success indicators : look out for visual cues like color changes in vegetables or textures of meats to know when something is done rather than just relying on time alone .
expert techniques
to elevate your cooking game further :
-
master professional methods like sautéing and braising, these techniques bring out rich flavors but require careful attention .
-
pay attention to critical steps such as deglazing after browning meat or allowing doughs/resting times before baking you’ll notice big differences.
-
focus on precision points : use kitchen scales where necessary for dry ingredients instead of measuring cups; it makes a world of difference in baking.
-
regular quality checks are key throughout the process taste as you go. adjust seasoning early so nothing gets over - salted at the end .
success strategies
no one wants their meal turned into an epic fail. here are some troubleshooting tips :
if something isn’t coming together quite right a sauce too thick ? add a splash of broth or water slowly until it reaches desired consistency without compromising flavor .
for timing issues : if something cooks faster than expected, reduce heat immediately.
quality assurance starts with checking each ingredient's freshness before use; wilted herbs won’t taste good no matter how well - prepared they are.
want perfect results ? take note of adjustments made during cooking so you can replicate successful dishes later on keep track through notes.
as for final touches : don’t forget garnishes they add color and sophistication while enhancing flavor profiles nicely.
with these strategies under your belt, you'll be ready to tackle anything from weeknight dinners to fancy feasts like a pro chef. happy cooking.
success guaranteed tips
when it comes to crafting the perfect healthy pb and j, a little know - how goes a long way, start by selecting high - quality ingredients like organic whole grain bread and natural peanut butter without additives, this isn’t just about health; it’s about flavor too.
one pro tip ? spread your peanut butter on both slices of bread if you want to prevent sogginess from the fruit spread, trust me, i learned that the hard way when my jelly seeped through and created a gooey mess .
for those who want an extra boost of nutrition, consider adding chia seeds or even flaxseeds for some omega - 3s. these tiny powerhouses can elevate your sandwich from simple to sensational .
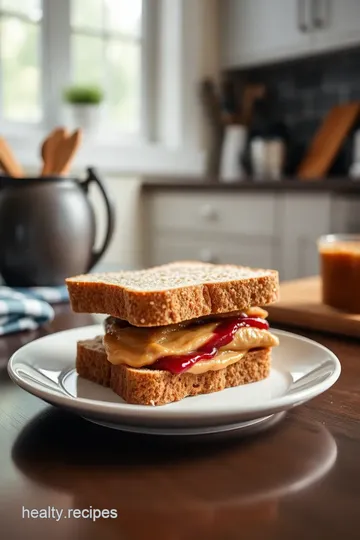
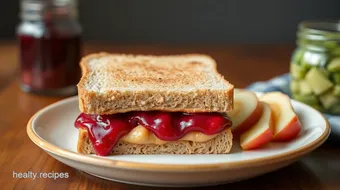
perfect presentation
let’s face it : we eat with our eyes first. for an appealing look, cut your sandwich diagonally there's something so satisfying about that triangular shape, right ? you can also layer fresh fruit slices neatly in between the spreads for more color and texture .
garnish ideas include a sprinkle of cinnamon on top or serving alongside vibrant berries on the plate, a drizzle of honey over the sliced bananas could really elevate your presentation game too.
if you’re feeling fancy (and i often do), serve it with a side of greek yogurt topped with nuts for that instagram - worthy brunch.
storage & make - ahead
planning ahead is key, especially if you’re juggling busy mornings, if you're making sandwiches for later in the week, store them in airtight containers, just be warned : they don’t keep well once assembled due to moisture from the fruit spread .
to preserve freshness longer, store each ingredient separately instead of assembling them all at once; this keeps everything nice and firm until you're ready to munch .
reheating isn’t necessary here since it's served cold but if you ever want warm toasted goodness pop it into a pan for just one minute per side until golden brown.
creative variations
feeling adventurous ? the beauty of this healthy pb and j is its versatility. swap out whole grain bread for gluten - free options like rice cakes or wraps it’ll still taste divine.
you can play around with different nut butters too; almond butter offers a great twist while sunflower seed butter caters wonderfully to nut allergies, seasonal twists like using pumpkin puree in fall or fresh peaches during summer adds unique flavors as well.
for those following specific diets (keto anyone ?), try low - carb wraps instead of traditional bread that's what adaptability looks like.
expert faq solutions
got questions ? you're not alone. one common concern is how to avoid sogginess after preparing your sandwich ahead of time, as mentioned earlier, spreading peanut butter on both sides helps tremendously as does keeping wet ingredients separate until ready to eat .
another question i get asked often is regarding sugar content in fruit spreads; always check labels before buying because some brands sneak in extra sugars under various names yikes.
and finally, don't stress if things don’t turn out perfectly the kitchen is all about learning through trial and error, sometimes those “mistakes” lead us down delicious new paths.
complete nutrition guide
let’s break it down : one healthy pb&j packs roughly 320 calories along with 12 grams of protein a solid choice post - workout or as an afternoon snack .
the dietary fiber content sits around 7 grams thanks to whole grains and chia seeds (if added), plus, you'll benefit greatly from essential vitamins found within fruits used either as spreads or toppings they're little nutritional powerhouses we sometimes overlook.
as far as portion guidance goes : one sandwich makes an excellent single serving but feel free to enjoy two if you're super hungry after hitting up that gym session or maybe just because it's so darn good.

Healthy Peanut Butter and Jelly Sandwich Card
⚖️ Ingredients:
- 2 slices whole grain bread (preferably organic or sprouted)
- 2 tablespoons natural peanut butter (smooth or crunchy, no added sugar/salt)
- 2 tablespoons low-sugar fruit spread (such as raspberry, strawberry, or blueberry)
- 1 tablespoon chia seeds (optional for extra nutrition)
- Fresh fruit slices (e.g., banana or strawberries) - optional but recommended for added flavor and nutrition.
🥄 Instructions:
- Step 1: Prep the Workstation: Gather your ingredients and utensils. You will need a butter knife, measuring spoons, and a plate.
- Step 2: Spread the Peanut Butter: Using the butter knife, take 2 tablespoons of natural peanut butter and evenly spread it on one slice of whole grain bread.
- Step 3: Add Chia Seeds: If using chia seeds for added texture and nutrition, sprinkle them over the peanut butter layer before adding jelly.
- Step 4: Spread the Fruit Spread: On the second slice of bread, use another clean knife to spread 2 tablespoons of your chosen low-sugar fruit spread evenly across the surface.
- Step 5: Include Fresh Fruit Slices (Optional): If you want to add extra flavor and nutrients, place thin slices of fresh banana or strawberries on top of either the peanut butter side or the jelly side.
- Step 6: Assemble Sandwich: Carefully place one slice on top of the other with their spreads facing each other to form a complete sandwich.
- Step 7: Cut & Serve: Use a sharp knife to cut your sandwich in half diagonally or into quarters if preferred. Place it on a plate and enjoy immediately!
Previous Recipe: Roasted Chickpea Quinoa Power Bowl Delight
Next Recipe: Quick Popcorn with Healthy Ingredients