Say Goodbye to Sticker Residue: A Quick and Easy Guide
Learn how to remove sticker residue easily with my simple techniques! Discover eco-friendly cleaning tips using household items. Try them today!

- Say Goodbye to Sticker Residue: A Quick and Easy Guide
- Essential Ingredients Guide: How to Tackle Sticky Situations!
- Mastering the Art of Professional Cooking: Your Easy Guide
- Pro Tips & Secrets for Tackling Sticker Residues
- Perfect Presentation of Your Cleaned Items
- Storage & Make-Ahead for Your Cleaning Supplies
- Creative Variations: Thinking Outside The Jar
- Complete Nutrition Guide for Your Cleaning Adventures
- Frequently Asked Questions
- Recipe Card
Say Goodbye to Sticker Residue: A Quick and Easy Guide
Opening Hook
Oh, hey there! let me tell you about that time i found an awesome vintage glass bottle at a thrift store.
It was perfect for my kitchen, but it had this annoying sticker residue on it. i tried scraping it, soaking it, you name it! i mean, who hasn’t been there, right? everyone loves a good find, but how to remove sticker residue can feel like an uphill battle! but don’t you worry—i learned some handy tricks to get that sticky stuff off without ruining my pretty bottle or going insane in the process!
Recipe Overview
So, sticker residue removal isn’t some ancient art form, but it sure does feel like it sometimes. this technique has been around as long as the adhesive itself.
Back in the day, folks had to deal with their fair share of sticky situations—literally! flash forward to today, and it’s just as relevant.
If people are trying to reuse old jars or crafting with glass containers, knowing how to clean sticker residue is a must-have skill in every household.
Time requirements? you’re looking at about 5 to 15 minutes, depending on how stubborn that adhesive is. and let me tell you, it’s easy enough for anyone to master—professional or amateur cleaner alike.
Your wallet will thank you too because you won’t need any fancy products. most supplies are what you already have lying around!
Key Benefits
Now, why even bother learning these sticky label removal tips ? for starters, there are tons of health benefits! using household items for cleaning, like baking soda and vinegar, is a smart, eco-friendly choice.
You’re avoiding all those harsh chemicals, and those natural solutions? they're really great for the planet! plus, if you ever have a last-minute gathering, showing off your neatly cleaned glassware will definitely impress your friends!
But wait, there’s more! this method is perfect for special occasions. you can clean out those old jars and fill them with homemade jams or infused oils for a beautiful, personal gift! it’s a game-changer for crafters, too—whether you're making diy gifts or trying to reuse empty containers, you want to get rid of those adhesive stains for a clean look.
One of the coolest things about this technique? it often works better than more traditional methods. plus, with just a few steps, you’ll be saying farewell to those pesky labels without damaging the item underneath.
Natural Transition to Ingredients Section
So, ready to dive into the magic of removing adhesive stains ? grab your supplies! i’ll show you just how easy it can be.
Keep reading to learn the ingredients you’ll need for a quick and effective way to tackle sticker residue like a pro!
Essential Ingredients Guide: How to Tackle Sticky Situations!
Oh my gosh, haven’t we all struggled with getting rid of sticky label remnants on jars and bottles? that sticker residue seems to stick around longer than your great aunt at a family gathering! but don’t worry, i've got your back.
Let’s dive into the essential ingredients guide that'll help you kiss those sticky situations goodbye!
Premium Core Components
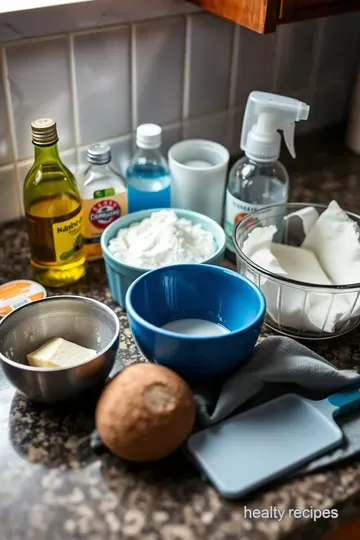
First up, you gotta know what you're dealing with. Here’s your rundown on the must-have ingredients for cleaning sticker residue :
- Cooking oil (vegetable or olive): You only need 1 tablespoon (15 mL) . Look for quality options—extra virgin olive oil can work wonders and it smells great too!
- Baking soda: Grab 2 tablespoons (30 g) . It’s a powerhouse for cleaning with vinegar and baking soda !
- Dish soap: Just a teaspoon will do. It’s an everyday hero in the cleaning world.
Storage guidelines? Keep baking soda in a cool, dry spot, or else its effectiveness goes south. Cooking oil should be kept in a pantry to avoid rancidity.
Signature Seasoning Blend
Okay, now let’s spice things up! Before you scrub away, how about creating a signature blend for sticker removal ? Here comes the fun part:
-
Essential oils: If you want more flair, toss a few drops of your favorite essential oil in! Maybe lemon for that zesty freshness?
-
Herb selections: Dried herbs can give just a hint of scent, but let’s focus on oils for now. You want to make your cleaning stuff smell as good as it works!
Are you following me? All of these things will give you that extra oomph while you tackle common feedback about cleaning glass jars !
Smart Substitutions
Now, what if you're in a pinch? Here are some smart substitutions you can use:
- Cornstarch can replace baking soda if you’re out. It won’t scrub as effectively but it’ll still assist in removing the residue!
- Essential oils for cleaning —if making an all-purpose cleaner, lemon or peppermint oil is your best bet.
- Emergency replacements: Rubbing alcohol can be your savior. Just pour a bit on a cloth and wipe away, no scrubbing needed for light residue.
And believe me, you’ll want to stock your cleaning supplies for those sticky situations !
Kitchen Equipment Essentials
Let’s talk must-have tools when cleaning up and removing adhesive stains:
- A soft cloth or sponge is key. Go for microfiber if you can—it won't scratch.
- A scraper (like a plastic spatula or credit card) is super helpful too. It’s all about being gentle here!
- Use a bowl for mixing your cleaning pastes; no diner-style plates needed here!
I remember one time I tried to scrape off a stubborn label with just my nails. Talk about disaster! A simple scraper would have saved me from that whole situation.
Tips & Tricks
Honestly, for a successful sticker removal operation, here are a few cleaning tips for kitchen surfaces :
- Test First: Always try your concoction on a small area to avoid any mishaps. No one wants to ruin a cute jar.
- Extra Grit: If the residue is stubborn, extra baking soda can work wonders for that added scrubbing power!
- Soaking: For super stubborn labels, soak your items in warm soapy water for about 30 minutes before getting started.
Remember, it’s key to work on items without rushing. You want to preserve what you’re cleaning!
So whether you're preparing to clean that vintage bottle or just have some beautiful jars needing some diy sticker residue removal , these tips will make your cleaning hustle a breeze.
And oh, you can even make those clean glass containers cute storage options in your kitchen!
Alright, ready to roll up those sleeves? Let’s jump into those step-by-step instructions on how to get rid of that pesky residue! Happy cleaning, y’all!
Mastering the Art of Professional Cooking: Your Easy Guide
Alright, friends! let’s dive into the world of those professional cooking methods . sounds fancy, right? but honestly, it just means becoming a better cook with some understanding of how to get stuff done in the kitchen.
We’re talking our game plan: from prep to cooking execution. grab your apron because we’re about to whip up some culinary magic.
Essential Preparation Steps
Mise en Place: The Foundation of Success
First things first— mise en place , or “everything in its place.” this nifty french phrase just means getting all your ingredients prepped and ready to go.
Chop, measure, and lay everything out before you start. this isn’t just for show—it keeps your brain from scrambling like a bad egg when you’re cookin’ up a storm!
Time Management Tips
You know when you’re deep into a recipe, and it feels like you're losing track of time? yeah, no bueno.
To keep you on your toes, set timers for key points in your cooking. like, if you’re roasting veggies at 425° f , set a timer for 20 minutes .
This keeps things on track and ensures you don't end up eating charcoal!
Organization Strategies
I can't stress this enough: organizing as you go is clutch! use bowls to separate ingredients and clean as you cook.
This means less chaos after the feast and a happier you. trust me, it’s way more fun to enjoy dinner than to face a mountain of dishes afterward.
Safety Considerations
Let’s get real; kitchen safety is a must! always have a fire extinguisher handy (just in case!) and keep your knives sharp—they’re much safer that way.
And of course, watch out for those hot pots. no one wants third-degree burns from a rogue saucepan!
Step-by-Step Process
- Gather Everything: Start with all your ingredients and tools within arm’s reach.
- Set Temperatures: Preheat your oven as per your recipe—sometimes it’s 350° F , other times it’s 400° F . Always check!
- Chief Timing Precision: Stick to the cooking times provided. If it says 15 minutes , set your timer—the dish won’t take care of itself!
- Look for Visual Cues: For instance, if you're baking cookies, when they’re slightly golden around the edges, it’s game over. Pull ‘em out!
Expert Techniques
Now, here’s where the pros shine. Grab your notepad!
Professional Methods
One cool technique is to create a flavor base using sautéed onions and garlic in oil. This brings depth and richness—game changer, folks!
Critical Steps Explained
Always sear your protein before cooking it through. That golden crust locks in flavor. Think of it like the best seal of approval!
Quality Checkpoints
Taste as you go! If you need a pinch of salt or a squeeze of lemon, add it. It’s your dish—make it sing!
Troubleshooting Tips
If your sauce is too thick, add a splash of stock or water. if it’s too thin, simmer a bit so it thickens.
And hey, if you burned the bottom? don’t fret—just strain the good stuff!
Success Strategies
Common Mistakes to Avoid
Overcrowding your pan? No, no! You wanna give your ingredients breathing room. Otherwise, they steam instead of brown, and what’s the fun in that?
Quality Assurance Tips
Smell matters! If something smells off, it probably is. Follow your senses—those little instincts usually know best.
Perfect Results Guide
Cooking is all about practice. If you miss the mark, just keep trying. That’s how you hone your skills!
Make-Ahead Options
Prep ingredients ahead; it saves time. Chop your veggies a day before or marinate chicken overnight for extra flavor. Trust me; you’ll feel like a kitchen pro!
Remember, the more you practice, the better you’ll become. as you embark on your cooking journey, also have fun with cleaning up! nobody likes sticker residue , but it’s easy to tackle with diy techniques.
Use natural solutions, like baking soda or vinegar—absolutely the best methods for removing stickers. you’ll be astonished at how effortlessly your surfaces can shine!
Now you’re armed not just with cooking prowess, but also with cleaning wizardry. Let’s make it a delicious adventure!
Pro Tips & Secrets for Tackling Sticker Residues
Ah, sticker residues—the bane of vintage lovers and diy crafters alike! no one likes dealing with those stubborn pieces of glue left behind by labels.
As someone who’s battled my fair share of adhesive demons, here are some pro tips i wish i knew sooner!
Chef's Personal Insights
First off, always test your cleaning solutions on a small part of the surface. this helps avoid any nasty surprises.
A little patch test can save your heart (and your item) from disaster. believe me, learning this the hard way was no picnic!
Time-Saving Techniques
Want to make your life easier? soak those stubborn jars in warm, soapy water before going to work. the heat and moisture can work wonders, softening the residue for an effortless clean.
It’s like a spa day for your jars!
Flavor Enhancement Tips
Okay, not exactly flavor, but let’s talk about scent. Want your cleaning concoctions to smell nice? Add a few drops of essential oils to your cleaning paste! Lavender while cleaning sticky labels? Yes, please!
Presentation Advice
When it comes to displaying your newly cleaned jars, don’t forget about how they look! A good tip is to group your jars by color or size – it makes for a pretty cool coffee table centerpiece!
Perfect Presentation of Your Cleaned Items
Now that we’ve tackled the residues, let’s make those jars and bottles look like showstoppers!
Plating Techniques
Think of your jars as canvas! use them to hold kitchen utensils, or fill them with colorful candies for a charming display.
Even filled with plain old sugar, they can add some rustic love to your kitchen.
Garnish Ideas
Don’t forget about the garnishes! Wrap twine around the neck of the jar or add a cute tag. It adds a personal touch and makes it feel special, even if it's just a jar of flour!
Color Combinations
Consider the colors around your home when arranging your newly cleaned items. A few vibrant jars next to some neutral tones can really pop and create a cozy vibe.
Visual Appeal Tips
Remember, visual appeal is about balance. Pair tall jars with short ones, and mix shapes. Your eye will dance around the arrangement!
Storage & Make-Ahead for Your Cleaning Supplies
Stashing away your cleaning supplies properly can save you time and stress.
Storage Guidelines
Keep your baking soda and oils in a cool, dry place. If you’re crafty (like I aspire to be), label your jars with which oils work best for sticker removal.
Preservation Methods
For the best results, make small batches of your cleaning paste. It’s super easy to whip up on the fly—no need for leftovers hanging around!
Reheating Instructions
Not much reheating involved here, but if your cleaning paste gets a bit dried out, just add a splash of water or more oil. It’ll come back to life in no time!
Freshness Duration
Your homemade cleaner can last a couple of weeks. Store it in an airtight container and give it a mix before reuse!
Creative Variations: Thinking Outside The Jar
Let’s get funky with this sticky situation!
Flavor Adaptations
Try experimenting with different oils! Coconut oil or even lemongrass oil can bring unique scents to your sticker-removal game.
Dietary Modifications
Okay, this isn't recipe-related, but think of this as adapting to what you have in your pantry. if you’re out of one material, don’t fret! other oils or safe household items can usually step in.
Seasonal Twists
I’ll frequently change things up depending on the season. Think of an orange-infused cleaner during fall—so fresh!
Regional Variations
Some folks in the South swear by Peanut Oil for sticker residue! Who knows? Maybe it’s a secret weapon for the south's sticky labels!
Complete Nutrition Guide for Your Cleaning Adventures
Alright, this is a non-traditional recipe, but here's your nutritional breakdown for cleaning!
Detailed Breakdown
- Baking Soda : Gentle abrasive that helps lift tough residues while being safe for many surfaces.
- Essential Oils : Natural and eco-friendly, add pleasant scents to your cleaning regime.
Health Benefits
Using nature-based ingredients helps you steer clear of harsh chemicals. Your home will smell better, and so will you after some light cleaning!
Dietary Considerations
Worry not! This isn't food, but being eco-friendly and using natural solutions can really give your conscience a boost.
Portion Guidance
An easy rule of thumb—one batch per cleaning session. That way, you won’t have any waste to worry about.
So, there you have it! Battling sticker residues isn’t just about removing junk; it’s an art. With the right techniques, you can not only clean but also repurpose and refresh your spaces.
As someone who once let sticker residues rule my life, i’ve found joy in making my home a more polished environment.
So, go ahead, embrace those cleaning tips and say goodbye to sticker residues for good! happy cleaning, my friend!
Frequently Asked Questions
What ingredients do I need for how to remove sticker residue?
You'll need some basic household items! For a standard removal, gather cooking oil, baking soda, and dish soap. If you're dealing with tougher residues, white vinegar and rubbing alcohol can work wonders!
Can I use this method on plastic surfaces?
Yes, but be gentle! Plastic can scratch more easily than glass, so use a soft sponge instead of anything abrasive, and always test in a hidden area first to avoid any damage.
How long does it take to remove sticker residue?
The process is pretty quick! After preparing your cleaning paste, allow it to sit on the residue for about 5-10 minutes. Overall, you can expect to spend about 5-15 minutes, depending on how stubborn the residue is.
Are there any tips for tougher sticker residues?
If the residue is particularly stubborn, you can soak the item in warm, soapy water for 30 minutes before trying the cleaning paste. Also, adding a little more baking soda to your paste can enhance its scrubbing power!
What should I do if the sticker residue hasn't come off completely?
No worries! You can simply repeat the process or switch to your vinegar or rubbing alcohol for removal. These options often break down stubborn adhesive materials effectively.
What are some practical uses once I’ve removed sticker residue?
Once your jars and bottles are clean, get creative! Use them for storage of dried herbs or homemade infused oils, or simply enjoy them as decorative pieces around the house. A clean surface can spark all sorts of DIY inspirations!
Say Goodbye to Sticker Residue: A Quick and Easy Guide Card
⚖️ Ingredients:
- 15 mL cooking oil (vegetable or olive)
- 30 g baking soda
- 5 mL dish soap
- 15 mL white vinegar
- 15 mL rubbing alcohol
- Soft cloth or sponge
- Bowl
- Spray bottle (optional)
- Scraper (plastic spatula or credit card)
🥄 Instructions:
- Step 1: Gather your oil, baking soda, dish soap, white vinegar, rubbing alcohol, and cloth or sponge.
- Step 2: In a bowl, combine 15 mL of cooking oil, 30 g of baking soda, and 5 mL of dish soap. Mix until it forms a paste.
- Step 3: Rub the paste directly onto the sticker residue using your cloth or sponge. Work gently. Let sit for 5-10 minutes for stubborn residues.
- Step 4: After setting, scrub the residue with a clean cloth or sponge to lift it away. Repeat or try vinegar/alcohol if needed.
- Step 5: Clean the area with warm soapy water to remove residue from cleaning agents.
Previous Recipe: Easy & Zesty Limoncello Recipe: A Slice of Italy in Every Sip
Next Recipe: Classic Italian Dressing Recipe: My Favorite Zesty Vinaigrette