Homemade Veggie Crisps
Craving a healthy snack? Discover how to make delicious veggie crisps at home with simple ingredients. Try these easy and nutritious recipes now!

- The Allure of Homemade Veggie Crisps
- A Tasty Tradition: The Historical Roots of Veggie Crisps
- Homemade Veggie Crisps: A Culinary Journey
- Why This Recipe Will Amaze You
- Health and Nutrition Highlights
- Recipe at a Glance
- Premium Ingredients Guide
- Kitchen Equipment Essentials
- Foolproof Cooking Steps for Homemade Veggie Crisps
- Expert Kitchen Wisdom
- Storage and Make-Ahead
- Creative Variations
- Complete Nutrition Guide
- Expert FAQ Solutions
- Recipe Card
The Allure of Homemade Veggie Crisps
Have you ever found yourself munching on a bag of store-bought snacks and wondering, “why on earth haven’t i tried making my own?” if so, you’re not alone! this simple query actually opens up a delicious whole new world.
Today, i’m here to chat about my fantastic journey into the realm of homemade veggie crisps . this delightful recipe not only takes a breeze-through 15 minutes to prep but also requires minimal cooking skills, making it perfect for anyone from seasoned chefs to kitchen newbies.
Now, what makes these crispy little wonders so special? well, let’s be clear: they’re not just snacks; they’re nutritious baked veggie snacks that shine with vibrant colors and unique flavor combinations.
Unlike their bagged counterparts packed with preservatives, these veggie crisps celebrate freshness straight from your kitchen. so, whether you're a health fanatic, a busy parent hunting for kid-friendly snacks , or simply someone who loves tasty munchies, this recipe will tick all the boxes.
A Tasty Tradition: The Historical Roots of Veggie Crisps
The idea of transforming vegetables into crispy treats goes way back. with roots in cultures all around the world, people have been drying and crisping veggies for centuries, long before diy veggie chips had initials.
From the sun-dried tomatoes of italy to the beloved crispy root vegetable chips in anglo-saxon fare, it’s clear that this creativity in food has historical significance.
The simplicity of seasoned snack recipes matches beautifully with the self-sufficiency of our ancestors who made the best out of what they had in their gardens.
What sets our homemade version apart today? for one, they’re ridiculously easy to whip up right in your own kitchen.
Enjoying a guilt-free, wholesome snack doesn't have to be complicated when you know how to roast a few veggies at the right temperature! plus, they’re incredibly versatile.
You can mix and match vegetables from your fridge, utilize leftovers, or try out fresh produce to discover dazzling new flavor profiles.
Homemade Veggie Crisps: A Culinary Journey
Let’s dive into the rich culinary heritage of homemade veggie crisps . this modern-day favorite draws inspiration from ancestral practices that emphasize the value of fresh produce.
But the charm doesn’t stop there; there's a fascinating origin story behind these colorful nibbles! in many cultures, the practice of preserving herbs and vegetables led to delightful snacks that tantalized taste buds through the ages—think of historical medieval feasts where creative flavoring was essential.
Now, in our fast-paced world, the popularity of baked veggie snacks is soaring. with health-conscious consumers seeking alternatives to traditional chips and heavyweight appetizers, these crispy treats have become the ultimate go-to.
The recognition of plant-based eating trends has made veggie crisps all the rage—and for good reason! crunchy, colorful, and packed with nutrients, they’re the snack alternatives we’ve all been waiting for.
Why This Recipe Will Amaze You
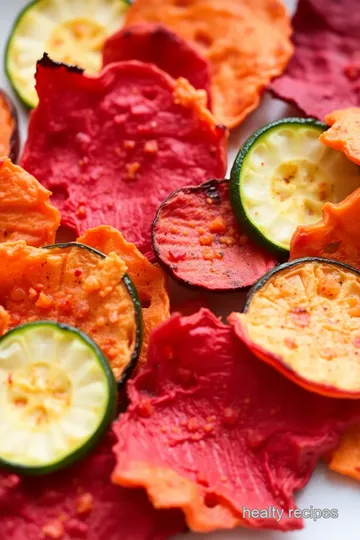
Now, if you’re still not convinced, let’s chat about those marvelous unique flavor combinations that await. imagine the sweet earthiness of beets mingling harmoniously with the richness of sweet potatoes.
A sprinkle of smoked paprika adds a mellow yet vibrant warmth. and because i’ve tested this foolproof technique countless times (and made my share of crunchy mistakes—trust me), i can confidently say that you’ll be a proud owner of perfectly crispy veggie crisps on your first try!
With simple tips like cutting your veggies uniformly and avoiding overcrowding on the baking sheets, you'll be set up for snacking success.
Plus, your friends will be begging for your secrets, especially when you pop out these easy-to-make gems during parties—imagine the fun conversations over a bowl of herb-seasoned veggie crisps !
Health and Nutrition Highlights
And here’s the delightfully healthy part: these veggie crisps aren’t just fun, they’re also loaded with benefits! each serving offers a delightful combination of vitamins and minerals without skimping on flavor.
They’re gluten-free , making them suitable for many dietary restrictions. not only are they high in fiber, thanks to those beautiful vegetables, but they also provide a nutritious alternative to standard chips.
What’s not to love about a snack that plays it cool while packing a punch?
Recipe at a Glance
To sum it up for you, here are the quick details on the Homemade Veggie Crisps recipe:
- Total Preparation Time : 35-40 minutes
- Skill Level : Easy
- Serving Size : 4 servings
- Cost Efficiency : Very budget-friendly given the ingredients you are likely to have at home!
Alright, craving those crunchy delights yet? next up, let’s dive into the list of ingredients you’ll need to whip up these mouthwatering veggie crisps.
Get your chopping board ready, and prepare to slice your way to crispy perfection!
Premium Ingredients Guide
Cooking is all about the ingredients. if you've ever tried to whip up a recipe only to discover your veggies are limp or your spices have lost their punch, you know what i mean.
So, let’s dig into selecting the best premium ingredients that take your meals from "meh" to "wow!"
Premium Core Ingredients
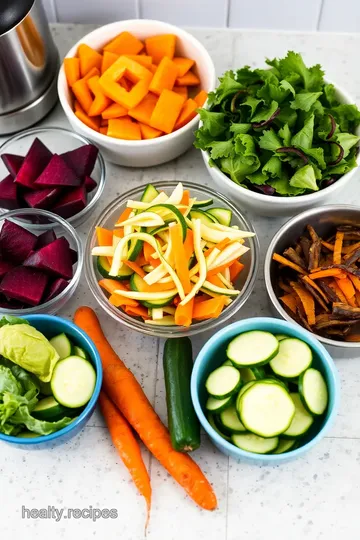
When it comes to veggie crisps , the first thing you need are the star vegetables. for my go-to homemade chips, you’ll want about 2 medium-sized beets, 2 medium-sized sweet potatoes, 1 zucchini, and 1 carrot .
Make sure they're fresh—sniff the veggies! if they smell earthy and not funky, you're good. you’re looking for vibrant colors and firmness.
When it comes to storage, wrap your veggies in a damp paper towel inside a plastic bag in the fridge.
They’ll stay fresh longer.
Of course, you can't forget the olive oil ! two tablespoons of it is perfect for coating your vege slices.
Always grab a good quality one—the kind that says "extra virgin" on the bottle. it can make a big difference in flavor.
Signature Seasoning Blend
Now, onto flavor town. my signature blend includes 1 teaspoon of sea salt, 1 teaspoon of smoked paprika, ½ teaspoon of garlic powder, and ½ teaspoon of black pepper .
Smoky paprika works wonders in giving your crisps that deep, satisfying flavor. want to jazz it up more? toss in some fresh herbs like rosemary or thyme for that aromatic touch—just be careful not to overdo it.
Fresh or dried, they can easily take your veggie game to the next level!
Smart Substitutions
Let’s say you’re all out of sweet potatoes, no worries! you can swap in parsnips or butternut squash. variety is the spice of life—or should i say, the spice of snack time? and for those who are keeping an eye on carbs, opt for zucchini instead.
If you're chasing something crunchy for the little ones, try carrot chips instead. and if the seasonal veggies are talking to you, use whatever’s fresh at the market.
Honestly, your options are endless!
Kitchen Equipment Essentials
Now, you cannot forget the tools of the trade. you'll need a mandoline slicer or a sharp knife for the most even cuts.
Trust me, those uneven slices are trouble! a good cutting board helps, too—just be sure it’s sturdy.
Baking sheets lined with parchment paper are a must; it keeps your crisps from sticking and makes cleanup a breeze.
If you have an air fryer , girl, don’t be shy to bring it out! it’ll whip up your veggie crisps in half the time while making them even crispier.
Pro Ingredient Tips
I learned the hard way—always check the expiration dates on your spices! old spices are like stale bread, and trust me, nobody wants that .
For olive oil, look for dark glass bottles to protect it from light. if you have leftovers, store them in a cool, dark cupboard.
Oh, and when buying your veggies, remember: local farmers' markets often have fresher produce compared to supermarkets. not only is it better for your plate, but it’s also easier on your wallet!
Final Thoughts
Now that we’ve walked through the best ingredients and tools for your homemade veggie crisps, it’s time to get your hands dirty! remember, cooking is hugely about experimentation and having fun.
So, don’t fuss over little mistakes; they often lead to the best discoveries in the kitchen.
And once you have everything prepped and ready, it's time to dive into the fun part—the cooking instructions. Trust me, the crunchy snack you’ll pull from the oven will be well worth the wait! Let’s get to it!
Foolproof Cooking Steps for Homemade Veggie Crisps
If you're anything like me, snacks play a big part in your day. i can't help but sneak a crunchy munch here and there, especially when it’s something as guilt-free as homemade veggie crisps.
Making these provides a fun twist to your typical snacking, not to mention they're a healthy and colorful way to indulge.
So, let’s dive into the kitchen!
Essential Preparation Steps
Mise en place details : first things first. gather your veggies! you'll need 2 medium-sized beets, 2 sweet potatoes, 1 zucchini, and 1 carrot.
Make sure to peel and slice them thinly. i sometimes forget this step, and trust me, it’s not fun to go back.
Think about uniformity; around 1/8 inch thick is perfect, making sure they cook evenly. trust me, it saves time and heartache later!
Prep techniques : grab a mandoline slicer if you have one. it's a game-changer for achieving those perfect slices. if you're more of an old-school cutter, just be careful with those fingers.
Slice steadily, and you’ll be golden.
Time Management : Set aside about 15 minutes for prep and another 20-25 for cooking. This gives you enough time to clean up a bit while they bake.
Organization tips : have your spices at the ready: sea salt, smoked paprika, garlic powder, and black pepper. you don’t want to be digging through the cupboard when you’re focused on crisping up your veggies.
Professional Cooking Method
Step-by-step Process :
-
Preheat the oven : fire up the oven to a toasty 400°f (200°c) and line two baking sheets with parchment paper.
Preheating really makes a difference in getting that crisp factor just right.
-
Mix it all up : in a large bowl, toss your sliced veggies with 2 tablespoons of olive oil and those lovely seasonings.
I recommend getting your hands in there—nothing beats a good veggie massage for even coating!
-
Lay it Out : Spread the slices in a single layer on the baking sheets. Remember, no overlap. The more spread out, the crisper they’ll be.
-
Supervise the baking : slide those sheets into the oven and set a timer for 15 minutes. yes, you need to watch ‘em! different veggies cook at different paces.
Feel free to rotate the trays halfway through.
-
The finishing touch : when the edges of the veggies start flirting with golden brown, you're on the right track.
You’re looking for a nice crispy texture, which usually takes about 20-25 minutes total, maybe more for thicker slices.
-
Cool it down : once they're out of the oven, let them chill for a few minutes. they’ll harden up as they cool.
Seriously, resist the urge to munch right away—burned fingers are not the vibe we're going for!
Expert Techniques
- Critical Steps : Don’t compromise on slicing thickness. I learned this the hard way with some soggy zucchini chips!
- Precision Points : Use a thermometer to check for doneness if you want to be precise. Just kidding—trust your eyes and nose, folks!
- Quality Checks : Taste a little piece just to make sure it’s seasoned to your liking. A pinch more salt might just do the trick.
Success Strategies
Troubleshooting Tips : If they’re still a bit soft after baking, pop them back in for another 5 minutes. Don't be too hasty! Overcrowded trays are the enemy.
Quality assurance : always taste test! crispiness is key; underdone veggies can ruin your whole groove. i often play around with different root veggies, but my go-to remains those bright beets and sweet potatoes.
Perfect results guide : want those crisps to be beyond perfect? customize your spice mix! i occasionally throw in cumin or chili powder for a spicy kick.
Just be sure to keep an eye on the timing.
Now that you've got the veggie crisps down to a science, let’s dive into some exciting variations and how you can take this recipe to the next level with dips and pairings.
Get ready for a crunch party!
Expert Kitchen Wisdom
When diving into the world of homemade veggie crisps, i can’t emphasize enough the importance of a good technique . you want those bad boys to be crispy but not burned — it’s like trying to find the sweet spot in a well-done roast.
I remember the first time i went rogue , cranking the oven up too high, and let’s just say, my kitchen turned into a smoky mess.
So trust me on this: a steady 400°f is your best bet for that perfect crunch.
A dash of smoked paprika ? oh, you bet! it’s that secret flair that jazzes up the plain veggie snacks.
Just make sure to toss your veggie slices thoroughly so they’re all coated evenly—you don’t want some bites flavorless while others pack a punch.
And speaking of tossing, my first attempt ended up with way too much seasoning on half of the carrots while the beets were basically solo with the salt.
Talk about uneven!
Perfect Presentation
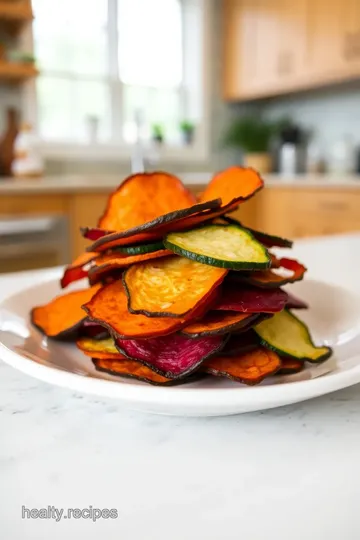
Plating your crispy creations could really elevate your snack game. trust me, a bit of thought about presentation goes a long way! i like to arrange my veggie crisps in a little mountain on a rustic wooden board.
Maybe sprinkle a few fresh herbs on top like rosemary or thyme —they look lovely, and the aroma? it’ll have your guests wondering if you've turned into a gourmet chef overnight!
Garnishing is key, but so is choosing the right serving dish. i often use a big, chic bowl for a casual vibe.
But if i’m having guests, i’ll rediscover my grandmother's fine china. the juxtaposition of colorful beet and sweet potato crisps against elegant dishes? it’s like a poor man’s fancy dinner party.
Plus, delighting your friends and family with a beautiful spread adds to the experience, doesn’t it?
Storage and Make-Ahead
Being the snack fiend i am, i can’t resist the urge to make a big batch of these veggie crisps ! you can easily store them in an airtight container and they should last a week—or maybe even less if i’m monopolizing them! just remember: they’re best stored at room temperature.
Going the fridge route can make them feel soggy, and no one wants that sad crisp, right?
If you decide to prep in advance, just take care to keep these bad boys cool and dry. reheating is another adventure; i’ve learned that zapping them in the microwave doesn’t do them justice.
Pop them back in the oven at 350°f for about 5-10 minutes to restore that crunch. a reminder to myself: patience is a virtue, even when it comes to snacks!
Creative Variations
The best part? you can totally switch things up here! if you’ve got a penchant for experimenting (like me, who sometimes punches out flavor with reckless abandon), these veggie crisps are a canvas.
Why not try some zucchini chips if you’re looking for a lighter option? or play with local root vegetables according to the season.
In the autumn, sweet parsnips are a dream—sweet, buttery, and a tad less work than carving pumpkins.
Got a family member who’s gluten-free ? you’re already ahead of the game! these crisps are inherently gluten-free and work well as snack alternatives for an all-day-long nibble.
Just don’t snitch them all as you chop; share the love, folks!
Complete Nutrition Guide
Alright, let’s get down to brass tacks (or should i say crisps ?). one serving packs around 120 calories. not too shabby for a snack that packing in nutrients from colorful veggies.
Each serving gives you a solid dose of fiber that’ll keep the tummy happy. i often whip these out when i’m feeling a little sluggish between meals.
Additionally, the health benefits of incorporating a variety of veggies are huge—load up on vitamins, minerals, and antioxidants! don’t forget, the customized flavors and spices you add can amplify these benefits—spices like turmeric and nutmeg have magic properties that can do wonders for your health.
Just keep an eye on portion sizes; it's all too easy to munch on these while binge-watching the latest series!
Expert FAQ Solutions
You might be thinking, “what if i burn mine?” don’t sweat it! i’ve burned more batches than i care to admit.
Just adjust your cooking time based on what veggies you use. potatoes might take longer while zucchinis crisp up quicker.
Keep checking every couple of minutes after the fifteen-minute mark.
Another common question? “can i make them in an air fryer?” absolutely! i’ve gone down that path too. cook them at 375°f for about 12-15 minutes, tossing halfway through.
You’ll still get that addictively crunchy bite with tons less oil.
Cooking should be a joyful adventure, and making homemade veggie crisps is certainly one of my favorites. don’t obsess over perfection; embrace the beautiful imperfection of cooking! these crisps are not only a delightful snack but a canvas for your creativity and nutrition.
So go on, grab those veggies from the fridge, and give it a whirl. your taste buds will thank you!
Homemade Veggie Crisps Card

⚖️ Ingredients:
- 2 medium-sized beets, peeled and thinly sliced (about 1 cup)
- 2 medium-sized sweet potatoes, peeled and thinly sliced (about 1 cup)
- 1 zucchini, thinly sliced (about 1 cup)
- 1 carrot, peeled and thinly sliced (about 1 cup)
- 2 tablespoons olive oil
- 1 teaspoon sea salt
- 1 teaspoon smoked paprika
- ½ teaspoon garlic powder
- ½ teaspoon black pepper
- Optional: Fresh herbs (rosemary, thyme) for garnish
🥄 Instructions:
- Step 1: Preheat your oven to 400°F (200°C). Line two baking sheets with parchment paper for easy cleanup.
- Step 2: Using a mandoline slicer or a sharp knife, thinly slice the beets, sweet potatoes, zucchini, and carrot. Aim for uniform thickness (around 1/8 inch) to ensure even cooking.
- Step 3: In a large mixing bowl, combine the sliced vegetables. Drizzle with olive oil and sprinkle sea salt, smoked paprika, garlic powder, and black pepper. Toss gently until all the vegetable slices are evenly coated with the oil and seasonings.
- Step 4: Lay the seasoned vegetable slices in a single layer on the prepared baking sheets. Avoid overlapping to allow maximum crispiness.
- Step 5: Place the baking sheets in the preheated oven. Bake for 15-20 minutes, or until the edges are golden brown and crispy. Keep a close eye on them after 15 minutes; some vegetables may cook faster than others.
- Step 6: Once done, remove the veggie crisps from the oven and let them cool for a few minutes on the baking sheets. They will crisp up further as they cool. Serve them warm or at room temperature, garnished with fresh herbs if desired.
Previous Recipe: Sesame Oil Alternative: 7 Best Substitutes for Your Stir-Fry
Next Recipe: Salmon Eggs: 5 Best Ways to Make Delightful Sushi Rolls