Vibrant Pitaya Bowl: A Tropical Breakfast Delight
Whip up a refreshing pitaya bowl in just 10 minutes! Packed with nutrients, it's the perfect healthy breakfast or snack. Try it today!

- Opening Hook
- Recipe Overview
- Key Benefits
- Transition to Ingredients
- Essential Ingredients Guide: Unlocking the Flavors of a Vibrant Pitaya Bowl
- Professional Cooking Method: Unlocking the Secrets to a Pitaya Bowl
- Pro Tips & Secrets
- Perfect Presentation
- Storage & Make-Ahead Magic
- Creative Variations
- Complete Nutrition Guide
- Wrapping it Up
- Frequently Asked Questions
- Recipe Card
Opening Hook
Oh my gosh, have you ever had one of those mornings where you just need a burst of sunshine to kickstart your day? a while back, i found myself in a breakfast rut, staring at the same old toast and coffee.
I mean, come on! that's when i stumbled upon the magical world of the pitaya bowl . seriously, it was like discovering a hidden oasis in my kitchen.
That first bite was a total game-changer. the vibrant colors and tropical flavors pulled me right out of my morning slump.
If you haven’t tried it yet, trust me, your taste buds are in for a treat!
Recipe Overview
Now, let’s dive a bit into what makes this pitaya bowl so special. originating from the tropical regions of central america and southeast asia, pitaya , or dragon fruit , has quickly leaped into modern food culture.
Its stunning look and mild taste have made it a favorite among foodies and healthy eaters alike. today, you’ll find these colorful bowls popping up almost everywhere, from trendy cafes to instagram feeds.
You won't believe how quick and easy it is to whip up this dish! honestly, the prep takes just about 10 minutes —and there's no cooking involved! you just blend, chop, and voila! and the cost? you can create a delightful bowl for under $10, yielding enough for two generous servings.
Perfect for brunch with a friend or a solo breakfast that feels indulgent.
Key Benefits
So, let’s talk about those benefits. first off, pitaya is not just eye candy. it’s packed with nutrients. high in vitamins c and e, fiber, and antioxidants, it’s like a superhero in the fruit world.
As we all try to chase a healthy lifestyle food , a pitaya bowl is a tasty way to sneak in some nutrition.
Trust me, your body will thank you for it. and guess what? it makes for a beautiful centerpiece if you’re hosting brunch.
Who wouldn’t be excited to dig into a bowl that looks like a tropical vacation?
Beyond the health perks, it’s also infinitely customizable! you can layer it up with crunchy granola, fresh fruits like bananas and berries, and even a drizzle of coconut milk.
It’s like painting with food—your creativity is the limit. plus, it's a great option for those times when you want something light yet satisfying.
It beats a heavy breakfast any day, don’t you think?
Transition to Ingredients
Are you ready to jump into fruit-filled bliss? here’s what you’ll need to gather for your colorful pitaya bowl adventure.
Just grab some fresh pitaya, your favorite yogurt, and the toppings that make your heart sing. let’s get mixing because i can’t wait for you to try this dreamy breakfast treat!
Essential Ingredients Guide: Unlocking the Flavors of a Vibrant Pitaya Bowl
Oh my gosh, have you ever had a pitaya bowl ? if not, it's time to dive into this tropical delight! with its stunning appearance and mildly sweet taste, pitaya (or dragon fruit) is not just a treat for the eyes but also a nutritious breakfast, snack, or dessert.
But before we whip one up, let’s break down the essentials you'll need to nail this recipe.
The Building Blocks: Premium Core Components
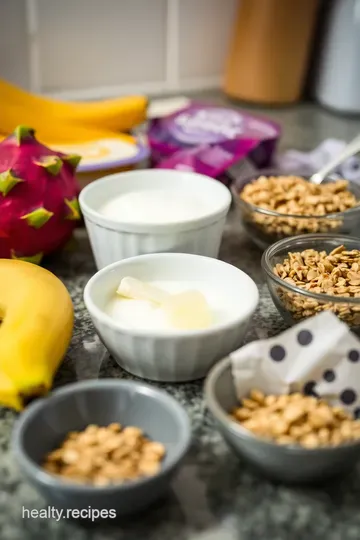
First things first— know your ingredients ! Here’s a little rundown for you.
- Pitaya: Get a ripe one! Look for bright pink or yellow skin. It should have a springy feel when you press it—like a nice firm peach. You want roughly 250g , or one medium fruit.
- Greek Yogurt: A cup of this creamy goodness adds protein and a tangy kick. If you’re going dairy-free, there are great vegan options, too.
- Honey or Agave Syrup: Just a tablespoon for that touch of sweetness. Use 15ml of either; both will do wonders for flavor.
- Toppings: Fresh fruits like bananas, berries, granola, and even nuts—you can't go wrong! The ½ cup of granola brings the crunch, while 2 tbsp of nuts adds that extra bite.
Spice It Up: Signature Seasoning Blend
Now, let’s talk about being a bit fancy! Customize your pitaya bowl with some spice and flavor.
- Seasonings? Keep it simple. You won’t need many for this bowl. Just a sprinkle of vanilla can take things up a notch.
- For that extra zest , think about adding some lime or lemon juice. It brightens everything up!
Smart Substitutions: Flexibility is Key
Life doesn't always go as planned—you run out of something, right? No problem!
- If you can’t find pitaya, açaí bowls make an excellent stand-in. They’re bursting with antioxidants!
- Don’t have Greek yogurt? Try any yogurt you like, or go with a little bit of smoothie!
And oh, if you’re watching your carbs, swap granola for some rolled oats for that same crunch but a lighter feel.
The Must-Haves: Kitchen Equipment Essentials
No fancy chef tools needed here! Just the basics, folks.
- Grab a blender or food processor. That’s how you’ll get that smooth pitaya base.
- A bowl for serving and a knife for chopping are all you really need. It’s honestly that straightforward!
The Freshness Factor
Let’s keep it real: ingredients matter! Here are quick tips on how to keep your stuff fresh.
- Storage: Keep your pitaya in the fridge and use it within a couple of days. Once you slice it, eat it quick!
- How to choose? When picking fruits, it's all about color and feel. Sturdy, vibrant fruits equal happiness in a bowl!
Whip It Up!
With this guide, you're not just making food; you're creating a moment. the pitaya bowl is more than just another dish—it's a canvas for your creativity and a step towards a healthy lifestyle food habit.
Whether it’s a quick morning fix or a snack that lifts your spirits, this vibrant bowl can be your go-to.
Just remember to have fun with it, go wild with toppings, and most importantly, enjoy every bite!
Ready to dive into the instructions? Let’s bring this fruit bowl creation to life!
Professional Cooking Method: Unlocking the Secrets to a Pitaya Bowl
So, you wanna whip up a killer pitaya bowl , huh? well, buckle up, because we’re diving into the vibrant world of this tropical breakfast delight! it’s a super easy dish that not only looks amazing but tastes even better.
Before we jump into the fun stuff, let’s chat about some essential preparation steps to get you all set up.
Essential Preparation Steps
Mise en place is your kitchen’s best friend. seriously, having everything prepped and ready to go makes cooking feel like a breeze.
Chop your banana and berries ahead of time. trust me, when you're blending that pitaya, you don't wanna be scrambling for ingredients like you're in an episode of "chopped.
"
Now, let’s talk time management . with a recipe that has a total time of just 10 minutes , you can easily manage that in your morning routine.
Just be sure to set a timer—because you don’t want to burn the toast while mixing the pitaya base, right?
Organization is key. Keep your cutting board handy and your tools all within reach. It makes everything flow smoother, kinda like a well-timed Saturday Night Live skit.
And for crying out loud, don’t forget about safety considerations —a sharp knife is a safe knife, but watch those fingers!
Step-by-Step Process: Perfecting Your Pitaya Bowl
-
Prepare the Pitaya: Slice that beautiful pitaya in half. Gently take a spoon, and scoop out the vibrant flesh. You want that bright pink goodness—don’t leave any behind!
-
Blend the base: toss the pitaya flesh, greek yogurt , and a drizzle of honey into your blender. blend until it’s smooth and creamy.
Keep an eye on it—if it’s too thick, maybe add a splash of coconut milk.
-
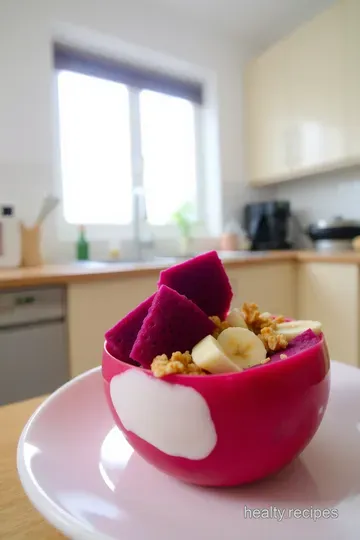
Assemble the Bowl: Grab two bowls and divide that delightful pitaya mixture.
-
Add Toppings: Layer on your sliced bananas, berries, granola, and those crunchy nuts. Seriously, the more colorful the toppings, the better!
-
Final Touch: If you’re feelin’ extra, drizzle on some coconut milk or yogurt for that Instagram-worthy finish.
Expert Techniques to Elevate Your Bowl
The best chefs know that little tweaks can make all the difference. for one, check your temperature control —you want everything at room temp, so those bananas don’t chill the mixture too much.
Timing is everything when you assemble your bowl. Aim for five minutes max for assembly, or your fruit might start to brown.
Look for visual cues : when you blend the pitaya, the moment it turns into a gorgeous smooth puree, that's your cue to stop.
There’s no such thing as over-blended pitaya (well, unless it becomes soup), but don’t go crazy with it!
Success Strategies: Getting it Just Right
Common mistakes? Overloading the bowl with too many toppings or using an unripe pitaya—ask me how I know! If your fruit doesn’t give a little when pressed, it’s probably too firm.
Quality assurance tip? Before serving, give it a taste—if you’re not feelin’ that perfect balance of sweetness, adjust with another drizzle of honey.
And if you wanna prep ahead, make the base the night before; just keep it in the fridge. That way, you can keep the morning low-key and chill!
Final Thoughts: Let's Get Fruity!
Making a pitaya bowl isn't just about the food; it's a whole vibe! It’s about bringing a little sunshine into your breakfast, embracing a healthy lifestyle , and enjoying some food therapy.
So there you have it! with these tips and tricks, you’re officially ready to create a stunning fruit bowl that will make both your taste buds and your instagram followers rejoice.
Stay tuned for more on the journey of cooking with vibrant flavors and healthy food dishes .
Happy cooking, and get ready for the ultimate food motivation boost! 🌟

Pro Tips & Secrets
So, let’s kick things off with some pro tips and secret insights i’ve learned along the way while making my fabulous pitaya bowl.
Honestly, every time i whip this up, i feel like i’m at some fancy brunch spot, but guess what? it’s super easy and doesn’t break the bank!
-
Pick the right pitaya : when shopping for your pitaya (aka dragon fruit), you want that vibrant pink or yellow skin.
It should give a little when you press it. ripe fruit is like a hug, ya know?
-
Time-saver alert : if you want an extra creamy texture, toss the pitaya flesh in the freezer for an hour before blending.
It’s like your bowl upgraded to a smoothie while you were off doing something else!
-
Flavor Boosters : Don’t be shy with flavors. Toss in a splash of vanilla or almond extract for a little zazz to the mix. Honestly, it makes a world of difference!
-
Garnish Like a Pro : Presentation is key! Don’t just dump toppings on. Try layering them to make it look appealing. You eat with your eyes first, right?
Perfect Presentation
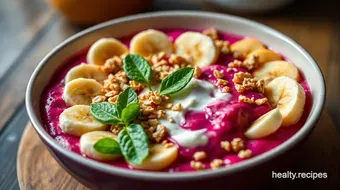
Speaking of visuals, let’s talk about how to make this pitaya bowl Instagram-worthy. Plating can be an art form, and this dish is your blank canvas.
-
Plating Techniques : Use shallow bowls or even plates. It gives a more elegant vibe. Just lay out that creamy pitaya mixture in the center and let it flow!
-
Garnish Ideas : Fresh mint leaves can make any dish pop. Plus, they smell divine! Sprinkle those bad boys on after you’ve arranged the toppings.
-
Color Variations : Use colorful toppings! Bright strawberries, blueberries, and yellow banana slices make the bowl vibrant and fun . It’s a party in a dish!
-
Visual Appeal : Play with height. Stack those banana slices or granola high to give some dimension. Trust me; it makes it even more tempting!
Storage & Make-Ahead Magic
Now, if you want to get all organized (who doesn’t love that?), here’s the scoop on storing your pitaya bowl .
-
Storage guidelines : if you’ve made too much, store the base mixture in an airtight container. it’ll keep in the fridge for up to two days .
Just remember, the fresher, the better!
-
Reheating instructions : since this is served cold, you won’t need to heat it. but if it’s been in the fridge, let it sit out for a few minutes to bring it back to life.
-
Make-Ahead Tips : You can totally prep the base the night before. Just grab it in the morning, throw on your toppings, and boom! Breakfast is served.
Creative Variations
Feeling adventurous? Let’s dive into creative variations for this pitaya bowl. There’s so much room for fun here!
-
Seasonal Twists : Got fresh peaches or ripe mangoes? Add those! Switch it up with whatever fruit is in season.
-
Dietary Modifications : Got a different dietary need? No problemo! Swap Greek yogurt for coconut yogurt for a vegan treat.
-
Regional Flavors : If you’re feeling inspired, try adding a splash of passion fruit or even a drizzle of peanut butter. It’s like taking a trip in every bite!
Complete Nutrition Guide
Let’s take a moment to talk about why this pitaya bowl is not just pretty but also packed with goodness .
-
Nutritional Breakdown : Each serving runs around 350 calories . And with that gorgeous fruit, you're loading up on vitamins, minerals, and healthy fats from nuts.
-
Health Benefits : The pitaya is high in antioxidants. Plus, Greek yogurt is great for your gut health. Hey, we all want that benefit!
-
Dietary Considerations : If you’re watching your sugar, cut back on the honey or agave. Trust me; the natural sweetness from the fruit is usually enough.
-
Portion Guidance : This recipe serves two, but let’s be real; who doesn’t love a hefty serving of deliciousness? Go ahead and treat yourself!
Wrapping it Up
So there you have it – everything you need to whip up this fun, tropical pitaya bowl full of flavor and color.
Remember, cooking and food should be fun, just like hanging out with friends. experiment with toppings, make it yours, and enjoy every colorful bite! whether you’re whipping this up as healthy food motivation for breakfast or looking for that perfect food therapy , you can’t go wrong.
Happy blending, friends!
Frequently Asked Questions
What is a pitaya bowl?
A pitaya bowl is a delicious dish made from the vibrant flesh of the pitaya (or dragon fruit), blended with yogurt and topped with an array of fruits, nuts, and seeds. It's essentially like a smoothie bowl that’s not only visually stunning but also packed with nutrients, making it a perfect breakfast or snack!
How do I know if my pitaya is ripe?
To pick a ripe pitaya, look for one with bright pink or yellow skin. Gently squeeze it; it should have a little give, similar to a ripe avocado. Avoid any that feel very soft or have blemished skin, as these are signs they are overripe or spoiled.
Can I prep my pitaya bowl in advance?
Absolutely! You can prepare the pitaya base the night before and store it in the fridge for an easy breakfast. Just keep the toppings separately, so they stay fresh and crunchy. In the morning, simply assemble and enjoy!
What toppings can I use for a pitaya bowl?
You can get creative with toppings for your pitaya bowl! Try using sliced bananas, fresh berries, granola, nuts, or even a drizzle of coconut milk or yogurt. Feel free to switch it up with seasonal fruits or additional superfoods like chia seeds or hemp hearts!
How should I store leftovers of my pitaya bowl?
If you have leftover pitaya mixture, you can store it in an airtight container in the fridge for up to 24 hours. However, it's best to add the toppings just before serving to keep them fresh and crunchy. Avoid freezing it, as the texture may change when thawed.
What are the nutritional benefits of a pitaya bowl?
A pitaya bowl is not just eye-catching; it’s also nutritious! It’s low in calories and provides a good amount of fiber, vitamins, and antioxidants from the fruits and toppings. If you add nuts and seeds, you'll also get healthy fats and protein, making it a balanced meal to start your day off right!

Vibrant Pitaya Bowl: A Tropical Breakfast Delight Card
⚖️ Ingredients:
- 1 medium ripe pitaya (dragon fruit) (about 250g)
- 1 cup (240ml) plain Greek yogurt or vegan alternative
- 1 tablespoon honey or agave syrup (15ml)
- ½ cup (70g) granola
- 1 small banana, sliced
- ½ cup (75g) fresh berries (e.g., strawberries, blueberries)
- 2 tablespoons (30g) chopped nuts (e.g., almonds or walnuts)
- 1 tablespoon chia seeds
- A drizzle of coconut milk or yogurt for garnish (optional)
🥄 Instructions:
- Step 1: Cut the pitaya in half and scoop out the flesh using a spoon.
- Step 2: In a blender, combine the pitaya flesh, Greek yogurt, and honey. Blend until smooth.
- Step 3: Divide the pitaya mixture between two bowls.
- Step 4: Arrange banana slices, fresh berries, granola, chopped nuts, and chia seeds on top of the pitaya base.
- Step 5: Drizzle with coconut milk or yogurt if desired and serve immediately.
Previous Recipe: Easy Savory Stuffed Button Mushrooms with Herbed Cream Cheese
Next Recipe: Classic Strawberry Preserves: Sweetness in a Jar